

[ad_1]
The delivery of the primary programmable blockchain, Ethereum, signaled the true starting of Web3. Accordingly, Web2 programmers began to transition their programming endeavors towards blockchain and dapp improvement. Since we’re nonetheless comparatively early to the age of Web3 and are hovering between the Web2 and Web3 period, now is a superb time to be taught dapp improvement. Furthermore, this dapp improvement tutorial is a good place to start out! This information will take you thru the required levels of constructing a dapp, together with working with good contracts – the backbones of decentralized functions. As well as, the upcoming dapp improvement tutorial will present how one can grow to be a Web3 developer together with your present JavaScript (JS) expertise!
The latter is feasible because of the final word Web3 backend platform – Moralis. This “Firebase for crypto” working system supplies you with the instruments to create dapps with most ease. As such, you’ll not have to take care of the restrictions of RPC nodes. Moreover, this pinnacle of the present Web3 tech stack affords a single workflow for constructing high-performance dapps. Furthermore, you get to index the blockchain, retailer off-chain information, and handle on-chain stock effortlessly. As well as, Moralis is all about cross-platform and cross-chain interoperability. Therefore, you get to make use of the platform you like and never restrict your self to any specific chain. Nonetheless, since we can be utilizing Moralis as we deal with the dapp improvement tutorial on this article, be certain that to create your free Moralis account earlier than shifting ahead.
What are Dapps?
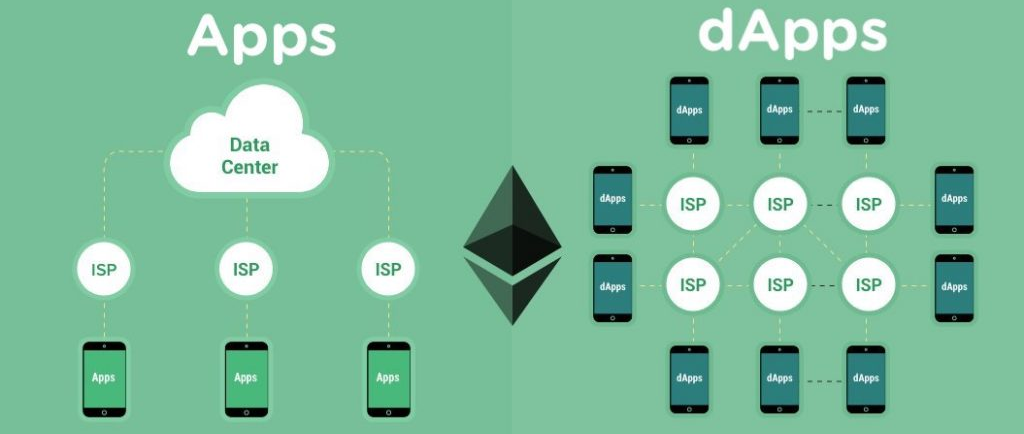
Earlier than we transfer on additional, let’s ensure you all know the fundamentals. So, what are dapps? Simply breaking down the phrase “dapp” already offers you a a lot deeper understanding. The “d” stands for “decentralized” and “app” for “utility”. Moreover, similar to common functions, decentralized apps can also are available in varied kinds. Dapps will be Web3 web sites, Web3 cellular apps, Web3 video games, and so on. Finally, if an utility interacts with any specific blockchain in any method, it’s labeled as a dapp.
In the case of decentralized functions, all of them incorporate Web3 authentication. A Web3 pockets reminiscent of MetaMask permits dapps to carry out Web3 login and authenticate customers. Nevertheless, we should level out that the majority web customers at the moment use the extra acquainted methodology, Web2 login. Thus, it often is sensible (relying in your viewers) to incorporate the acquainted gateways. Happily, you’ll be able to create dapps that embody Web3 authentication through e-mail utilizing the precise instruments. After all, you’ll be able to additional increase Web3 person onboarding by implementing Web3 social login. Nonetheless, most dapps authenticate with MetaMask.

Dapp Growth Tutorial – Demo
It could be counterintuitive to start out on the finish. Nevertheless, we worth your time; thus, we wish to guarantee you understand what to anticipate from this dapp improvement tutorial. As well as, it would additionally assist you resolve if you wish to roll up your sleeves shifting ahead.
So, that is the gist of our instance dapp’s frontend:
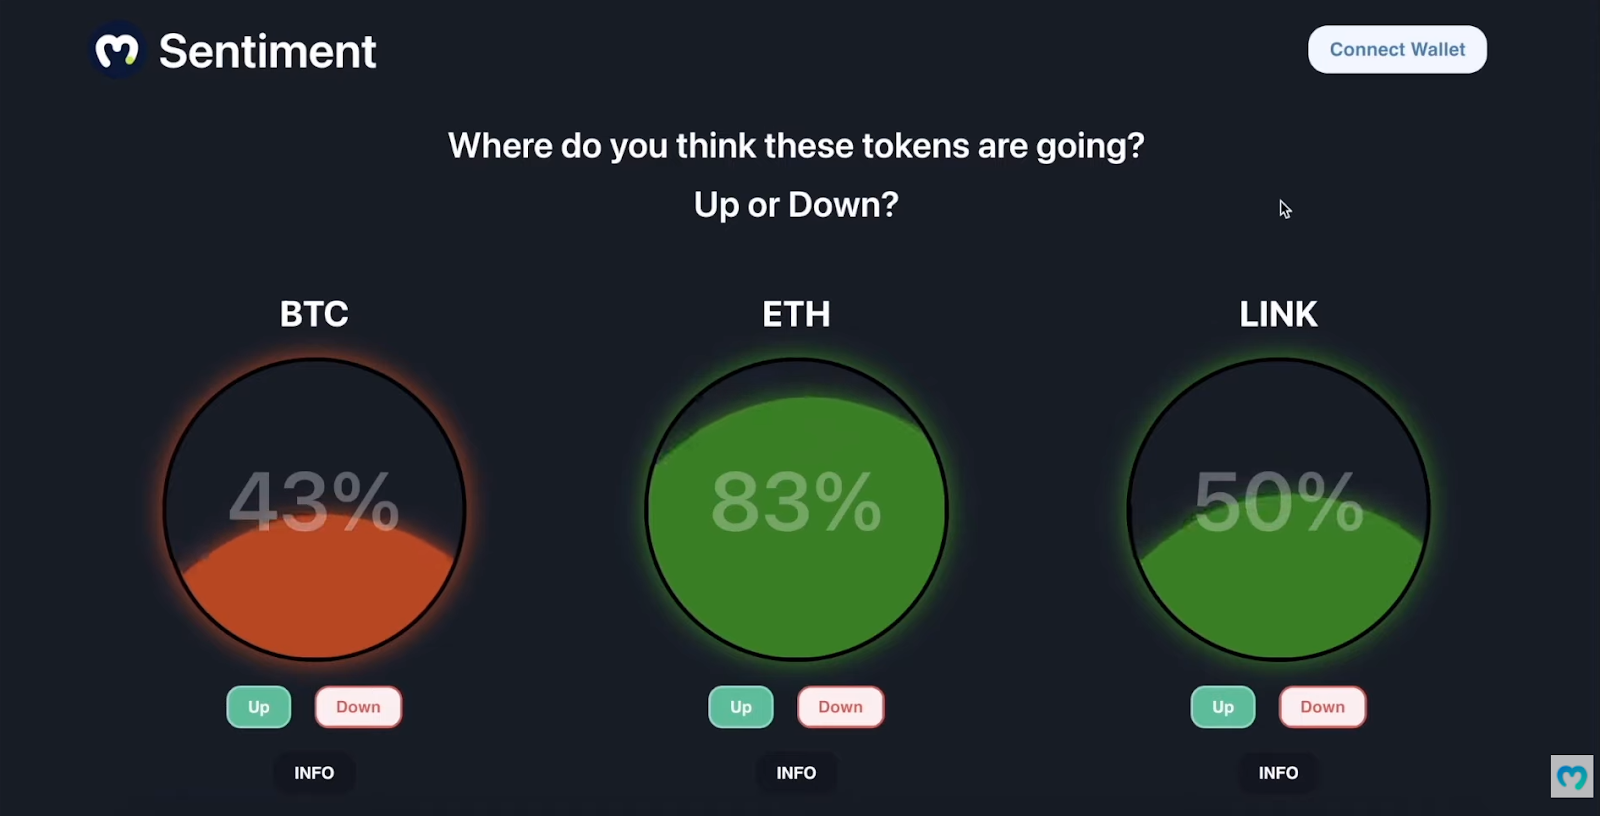
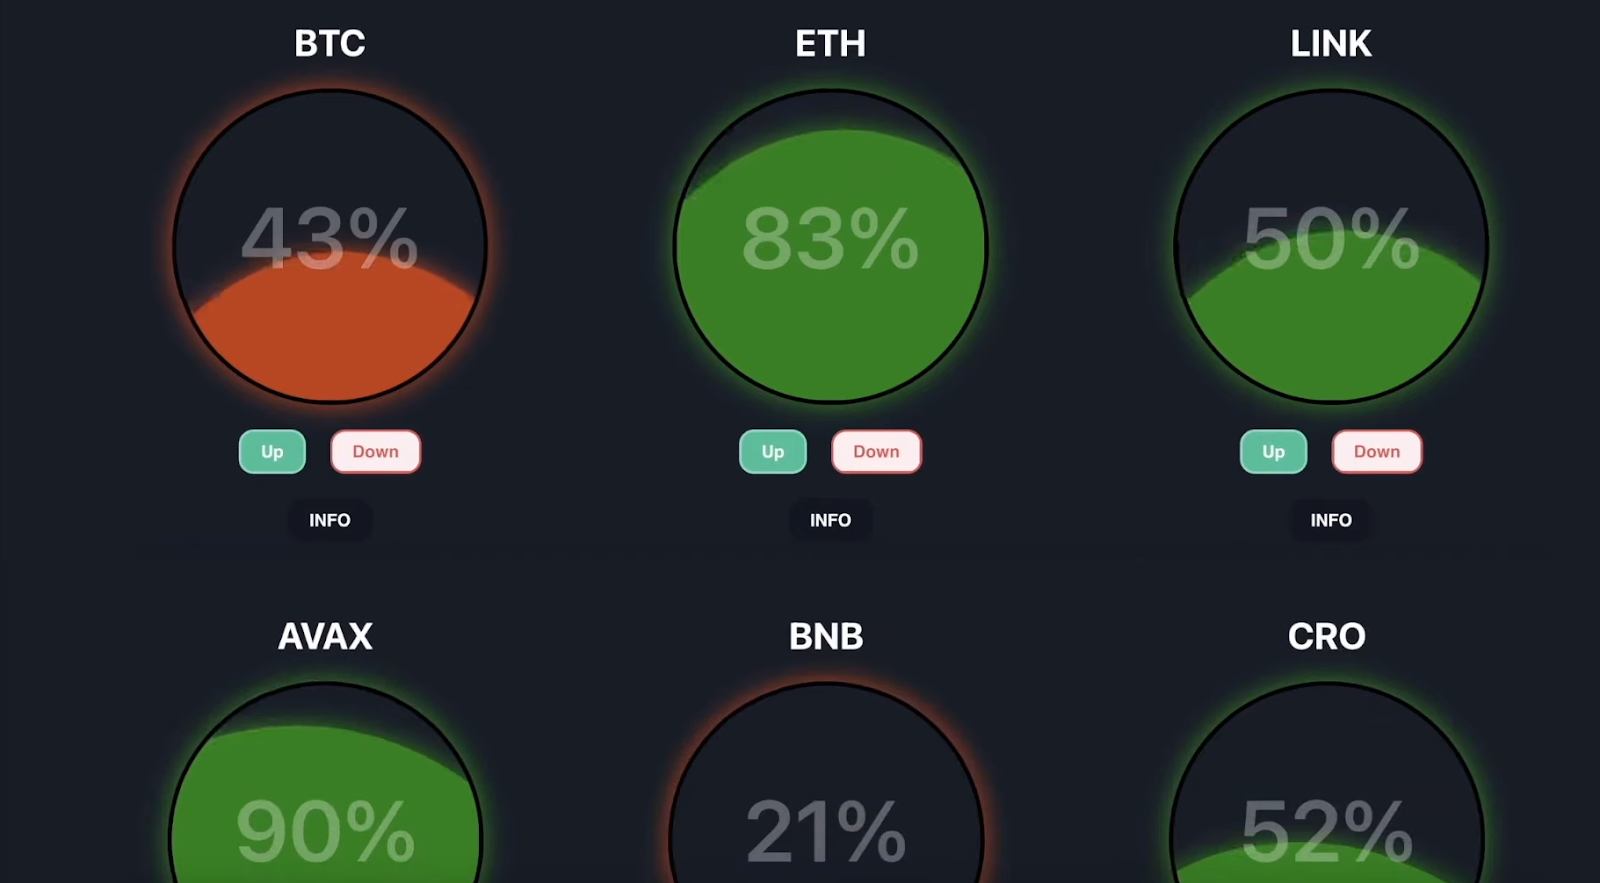
Wanting on the screenshot above, you’ll be able to see that you just’ll have an opportunity to construct a crypto sentiment dapp. The latter comes with a clear design and an intuitive UI. Additionally, the “liquid” inside every bubble is definitely animated. To have the latter illustrated, you may wish to watch the video on the finish of the article, beginning at 0:19. Apart from the above cash (BTC, ETH, and LINK), our dapp shows a number of different main cash when customers scroll down the web page:
Be aware: We designed our good contract to allow its house owners to simply add different tickers. You’ll see that within the dapp improvement tutorial beneath.
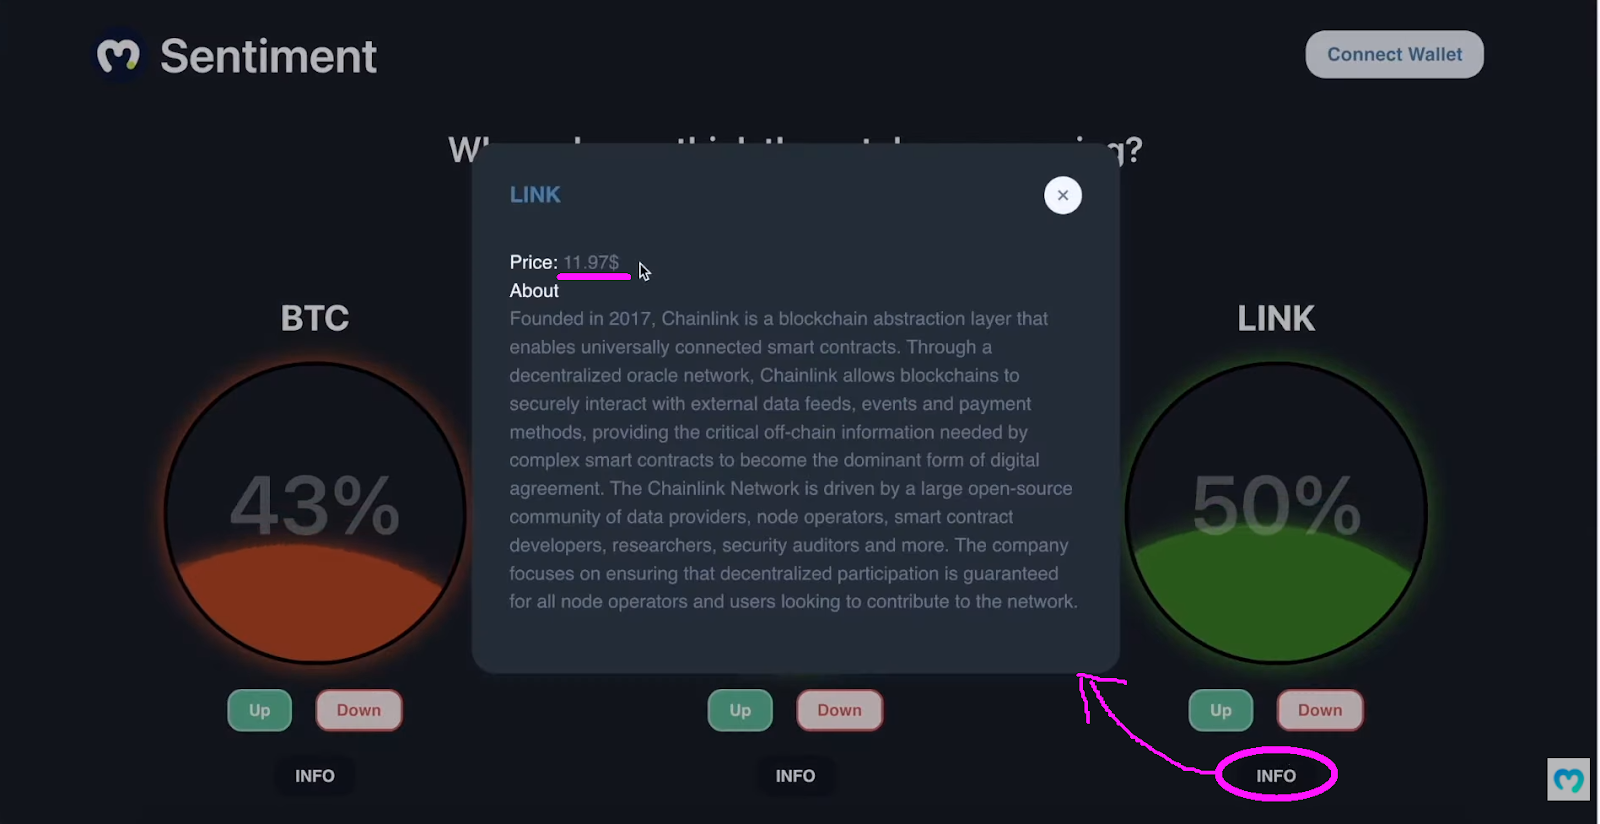
As you’ll be able to see, there are share values contained in the bubbles. They point out voters’ opinions. For instance, when greater than 50% of voters assume that the worth of a coin will go up, the “liquid” turns inexperienced. Alternatively, when the vast majority of voters imagine that the worth will drop, the “liquid” turns purple. As well as, our instance dapp has 4 forms of buttons. These are the “Up”, “Down”, and “INFO” buttons for every ticker and the “Join Pockets” button within the top-right nook. Due to Moralis and web3uikit, the latter takes care of authenticating customers. So far as the “data” buttons go, they open the “about” data and the present costs in a brand new pop-up window:
Web3 Login and Voting Demo
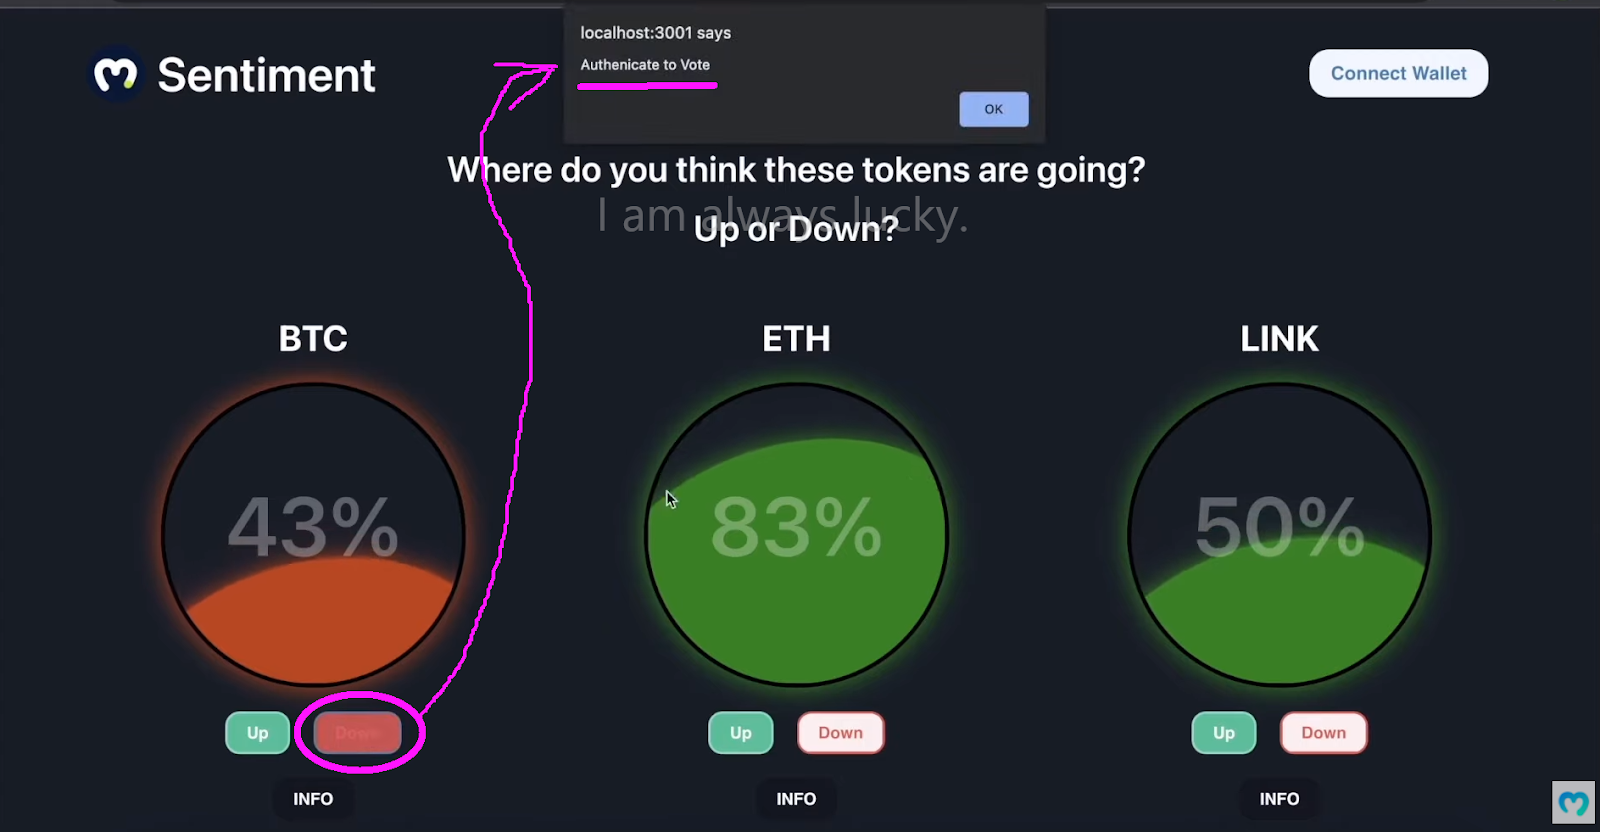
As defined within the “What are Dapps?” part, customers have to carry out Web3 authentication to make use of the dapp. So, if customers attempt to vote whereas signed out, they may obtain a warning message:
As such, customers want to make use of the “Join Pockets” button to authenticate themselves:
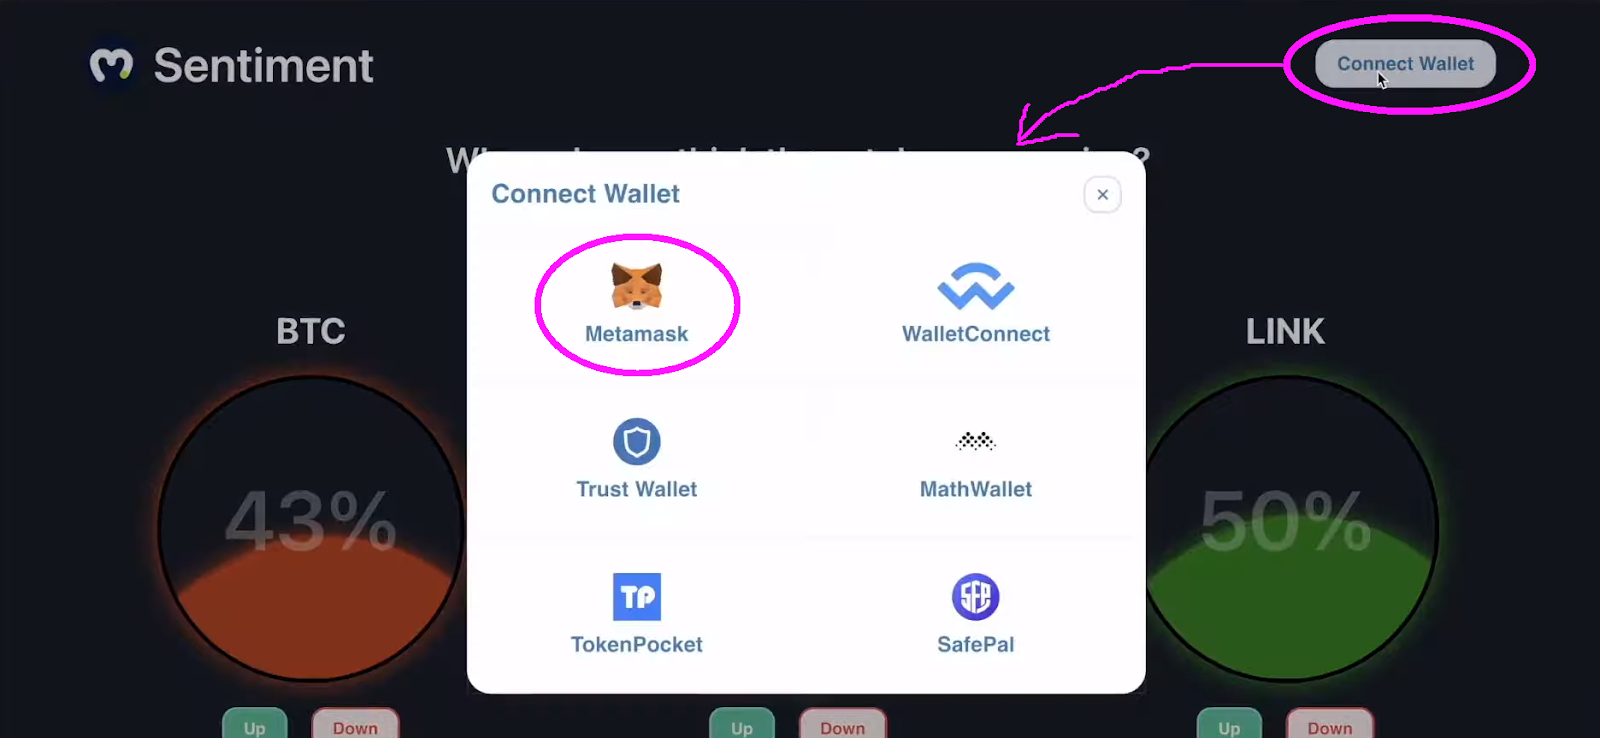
Because the screenshot above signifies, the instance person selects MetaMask, prompting his MetaMask extension. Accordingly, the person must signal the signature request to proceed:

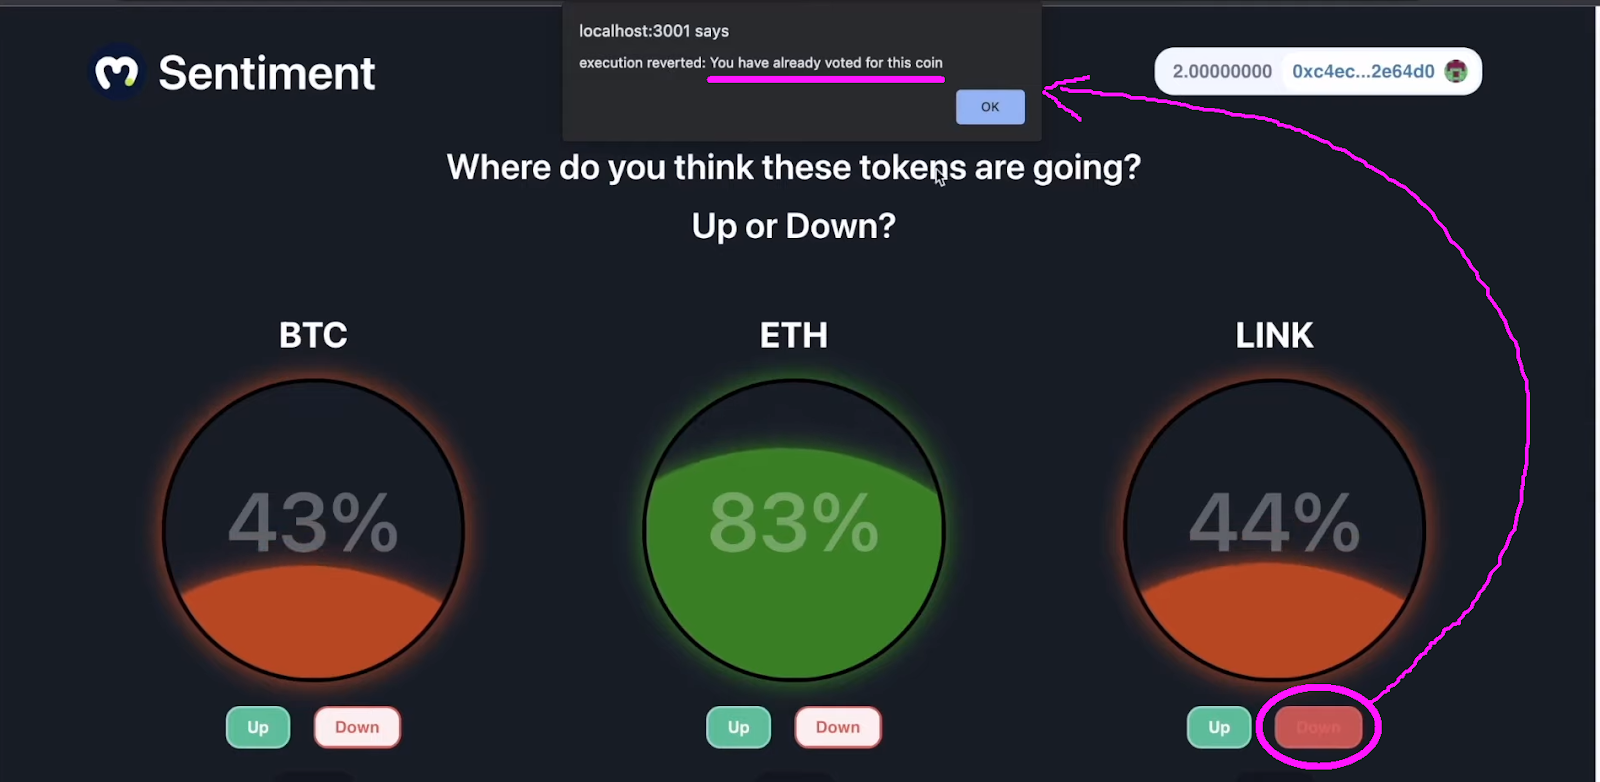
As soon as signed in, the person can solid his votes utilizing the “Up” and “Down” buttons. If the instance person decides to vote for LINK’s worth to go down, he clicks on “Down” below LINK. Moreover, you need to needless to say our dapp contains on-chain voting. As such, the person wants to verify his vote:
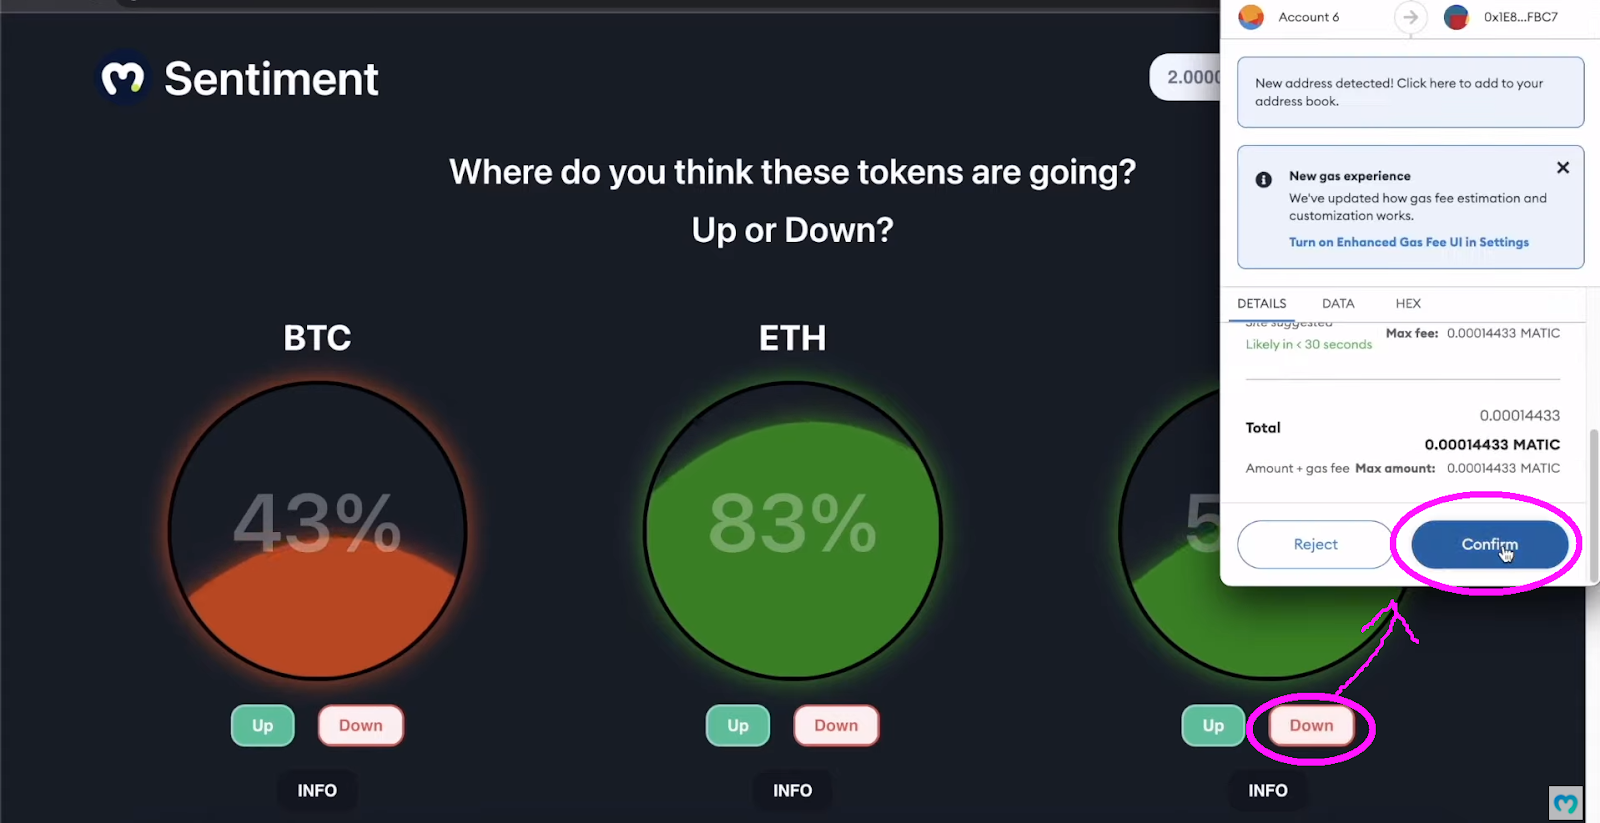
After the person confirms the on-chain transaction associated to his vote, the coin’s sentiment adjustments; after all, the importance of the change is dependent upon the overall variety of votes. Nonetheless, our good contract behind this dapp additionally prevents customers from voting greater than as soon as per ticker. As such, the instance person can’t vote for LINK once more:
That’s it for the UI demonstration of our instance Web3 utility. Though, let’s verify that the above-demonstrated transaction actually acquired recorded to the Mumbai blockchain (Polygon’s testnet). For that function, we use PolygonScan (testnet).
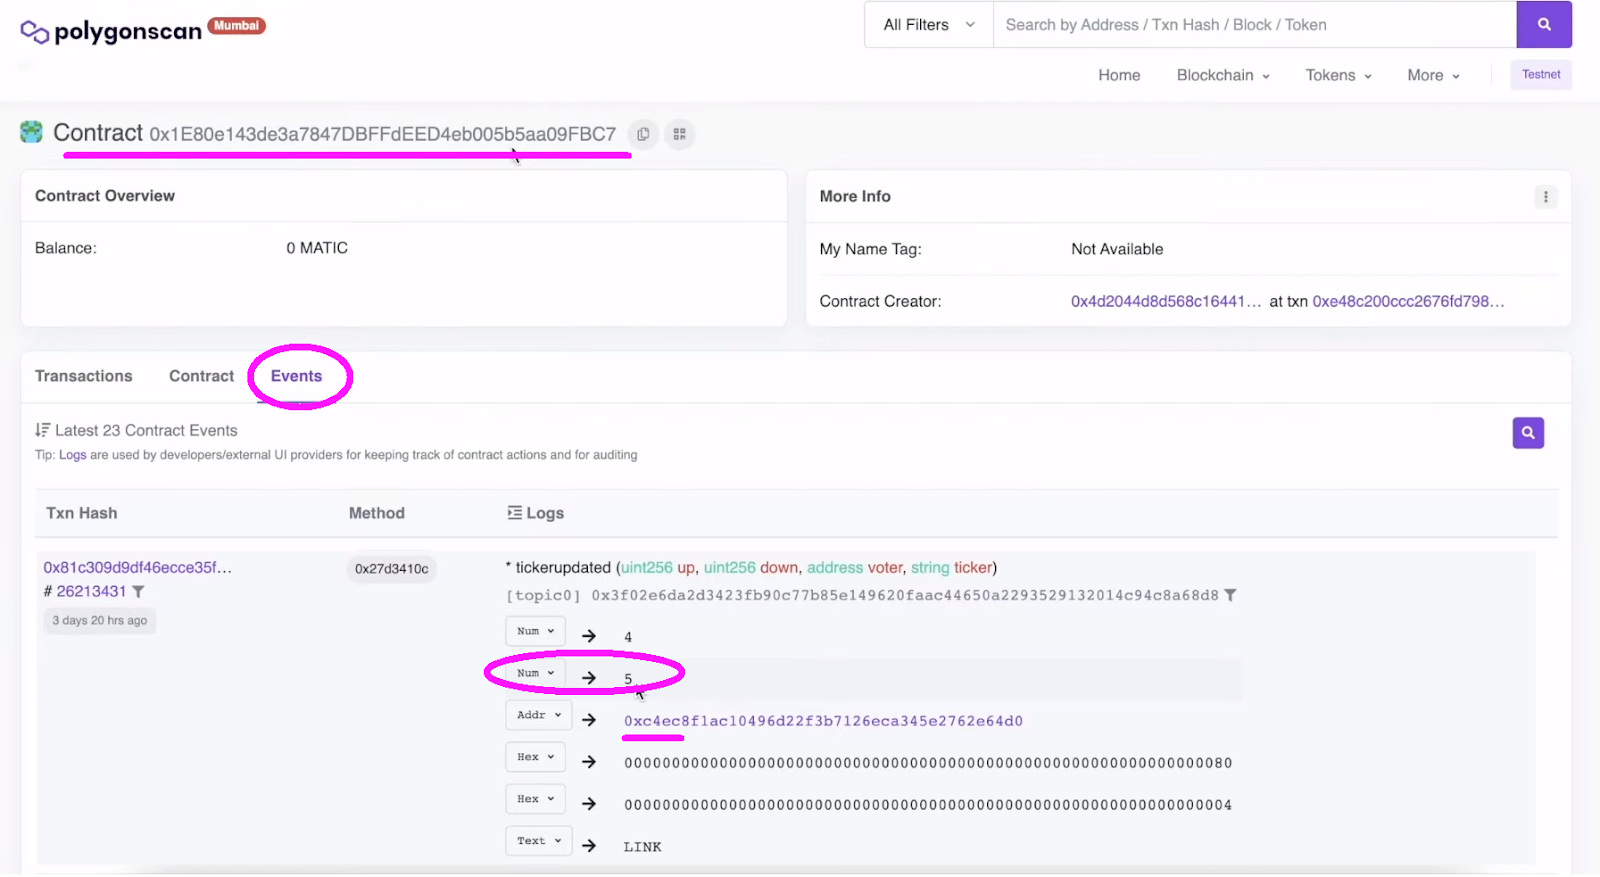
Wanting on the screenshot above, you’ll be able to see our good contract’s occasion. The market worth is the one associated to LINK’s downvotes.
Dapp Growth Tutorial – Utilizing Hardhat, React, and Moralis
We hope you’re keen to construct your individual model of the above-demonstrated dapp. As you’ll be able to see, this can be a correct and totally purposeful utility, which has a number of shifting components. Therefore, this isn’t essentially the most primary dapp improvement tutorial. Nevertheless, it is among the finest methods to study all the most typical options of decentralized apps. So, if you happen to resolve to roll up your sleeves, you’ll discover ways to:
Be aware: The upcoming dapp improvement tutorial is predicated on the video on the backside of this text. So, for extra particulars, be certain that to make use of it together with timestamps that you will notice shifting ahead. The next sections and the video tutorial assume that you’ll use our starter code. After all, that doesn’t imply you’ll be able to’t use our closing code and fast-forward your progress.
The Preliminary Setup of Our Dapp Growth Tutorial
First, clone our starter code and open the mission inside your favourite code editor. We’re utilizing Visible Studio Code (VSC):
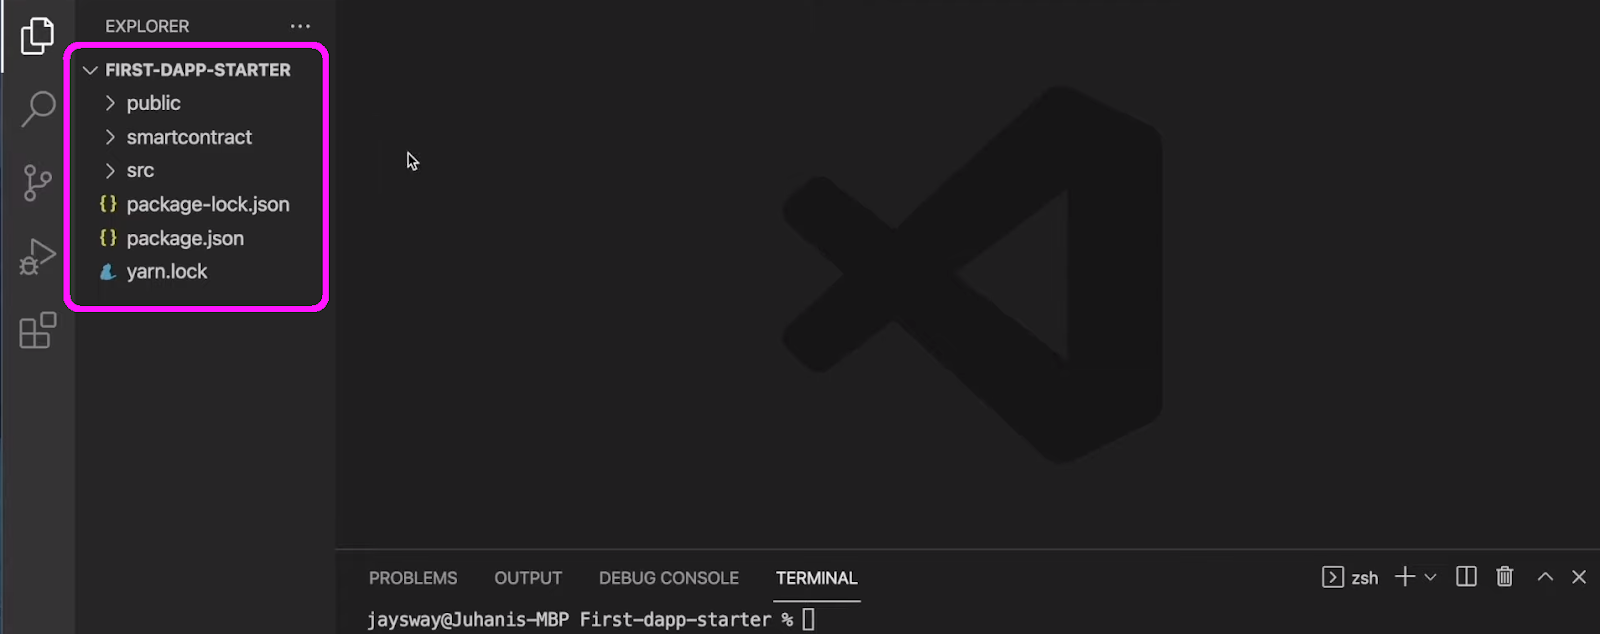
The above screenshot marks the preliminary structure of our instance mission. Moreover, since we can be utilizing Hardhat to work with our good contract, you additionally want to finish some setups associated to that dev surroundings. Use the video beneath beginning at 4:16. Use the “cd smartcontract” command to navigate to the “smartcontract” folder. Then, enter “npm i -D hardhat” to put in Hardhat:

Subsequent, use the “npx hardhat” command to provoke a brand new Hardhat mission. Then, choose “Create a primary pattern mission” and hit “enter” a few occasions whereas studying what the terminal is asking you:

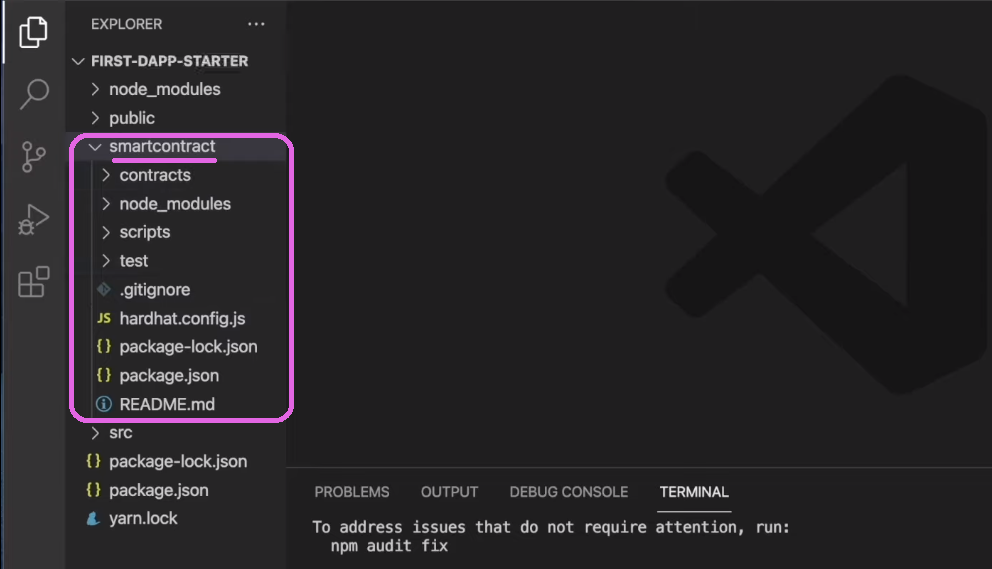
With a brand new Hardhat mission efficiently created, you’ll be able to see some new parts contained in the “smartcontract” folder:
Lastly, it’s essential set up two different dependencies. Use the next instructions:
- “npm i -D dotenv”
- “npm i -D @nomiclabs/hardhat-etherscan”
Utilizing Hardhat to Create, Compile, and Deploy Good Contracts
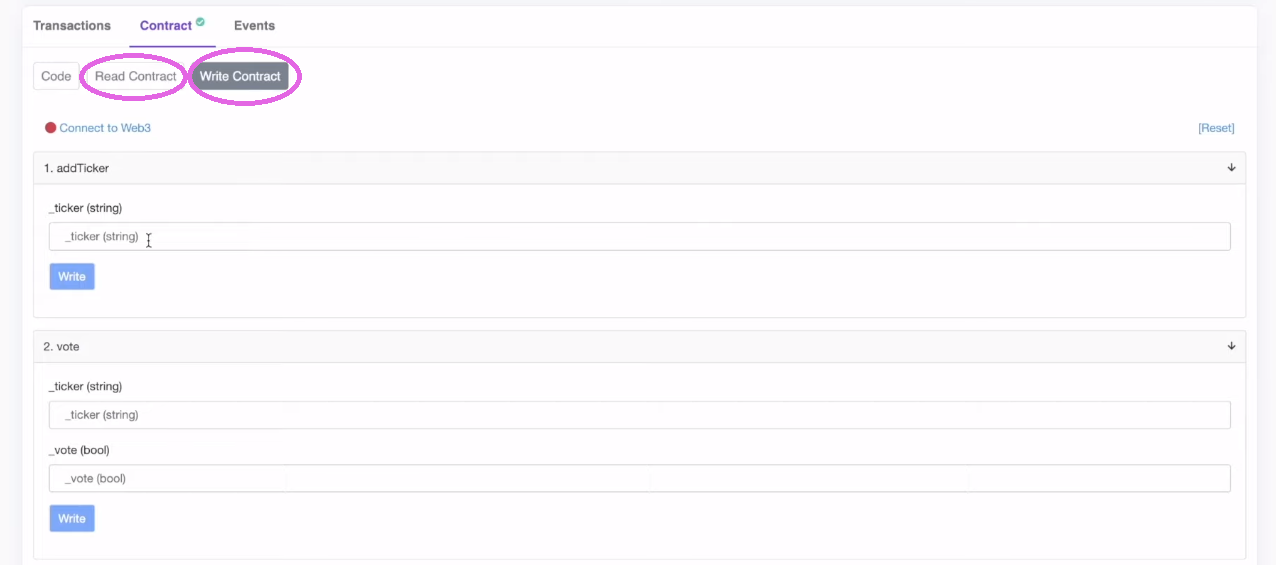
Utilizing the video beneath, beginning at 5:35, you’ll get to discover ways to create a correct good contract. You’ll use an present template file (“Greeter.sol”), rename it, and delete its content material. If you wish to write the contract your self, use the video tutorial beneath for an in depth code walkthrough. Nevertheless, you usually get to create killer dapps by copying already verified good contracts. A superb place for such Web3 contracts is OpenZeppelin. As such, it’s also possible to simply copy the complete code, which we made out there on GitHub (“MarketSentiment.sol“).
Be aware: In case you’re acquainted with Remix, it’s also possible to use that IDE to compile and deploy the above good contract.
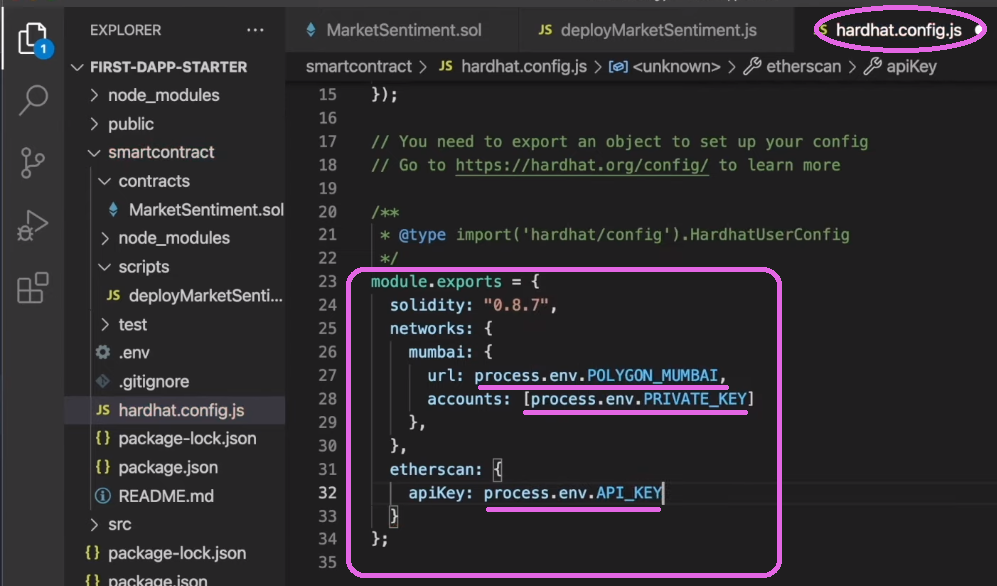
With the Solidity code prepared, it’s essential use Hardhat to compile and deploy the good contract. You should use any of the networks supported by Moralis; nevertheless, we suggest that you just comply with our lead and concentrate on Mumbai (Polygon’s testnet). It’s essential to tweak the “sample-script.js” file to do that efficiently. Principally, it’s essential replace it to match the brand new title of your “.sol” file (16:58). Beginning at 18:05, you’ll begin tweaking the “hardhar.config.js” file. There, you’ll additionally be taught to create your “.env” file, which can host three essential items of knowledge:
- PolygonScan’s API key to confirm your good contract (19:08)
- Mumbai testnet’s endpoint (19:54)
- Your crypto pockets’s personal key (20:40)
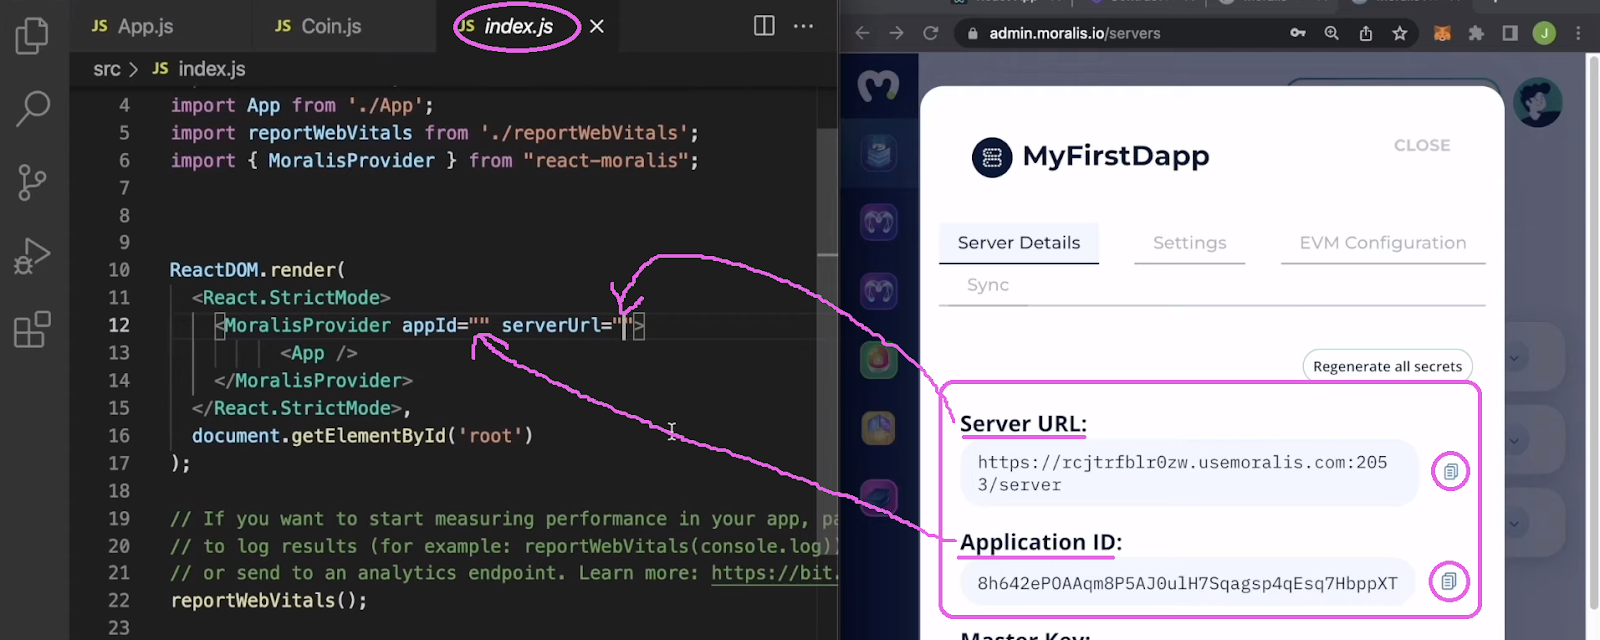
Surroundings Variables
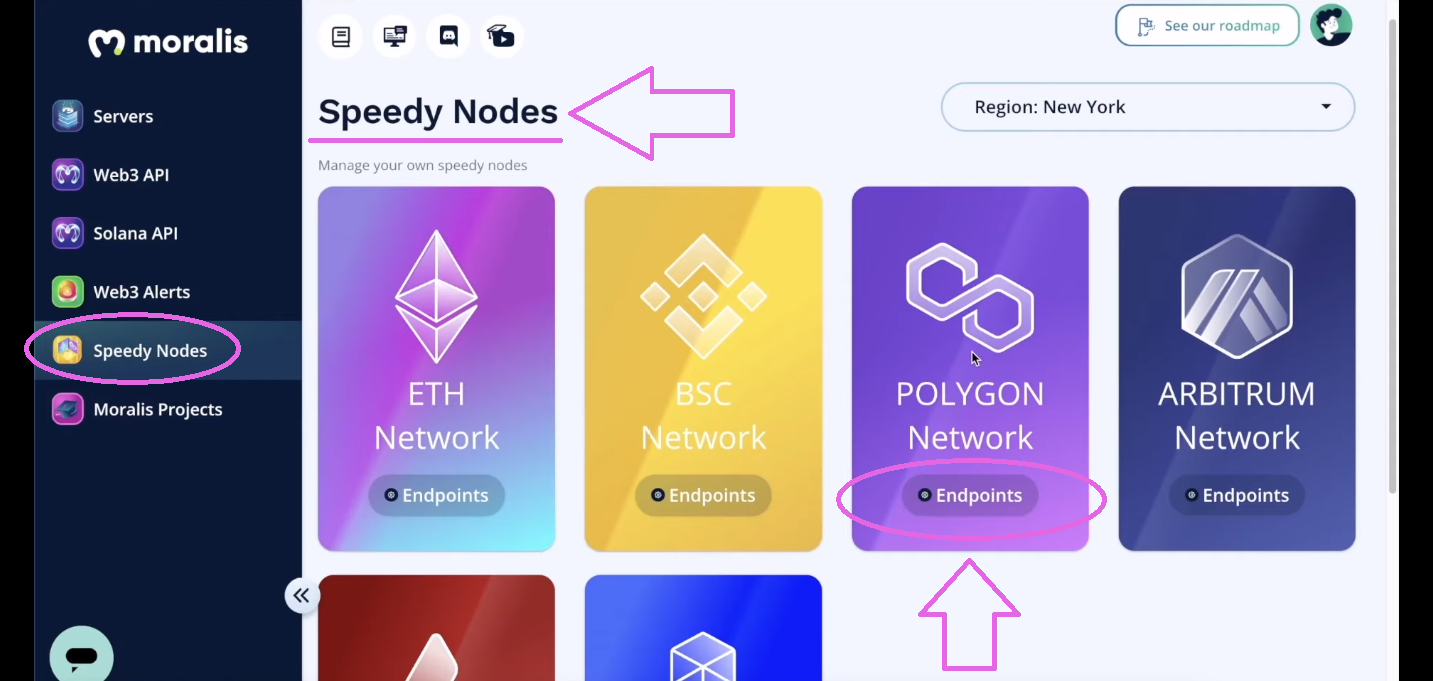
To get your PolygonScan’s API key, you will need to create your free PolygonScan account. Additionally, to acquire Mumbai testnet’s endpoint, you need to use Moralis Speedy Nodes (assuming you’ve created your free Moralis account):
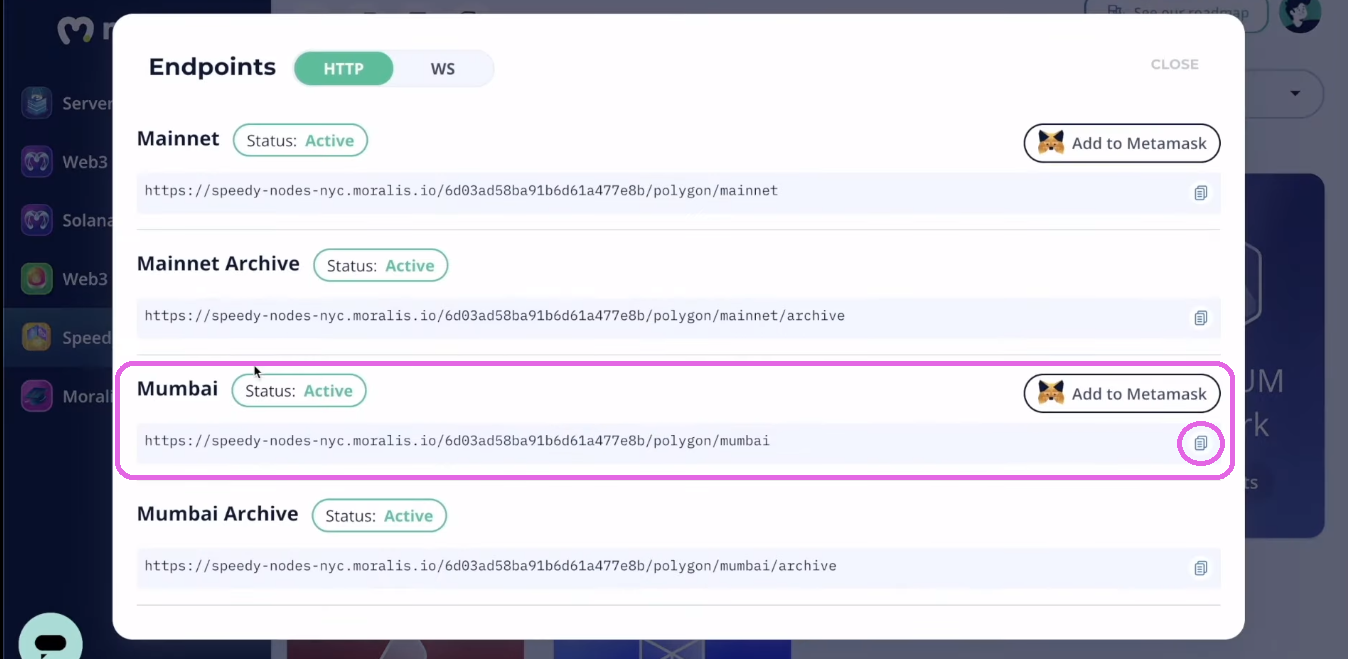
After clicking on the “Endpoints” button, you’ll see this pop-up display the place you get to repeat the URL:
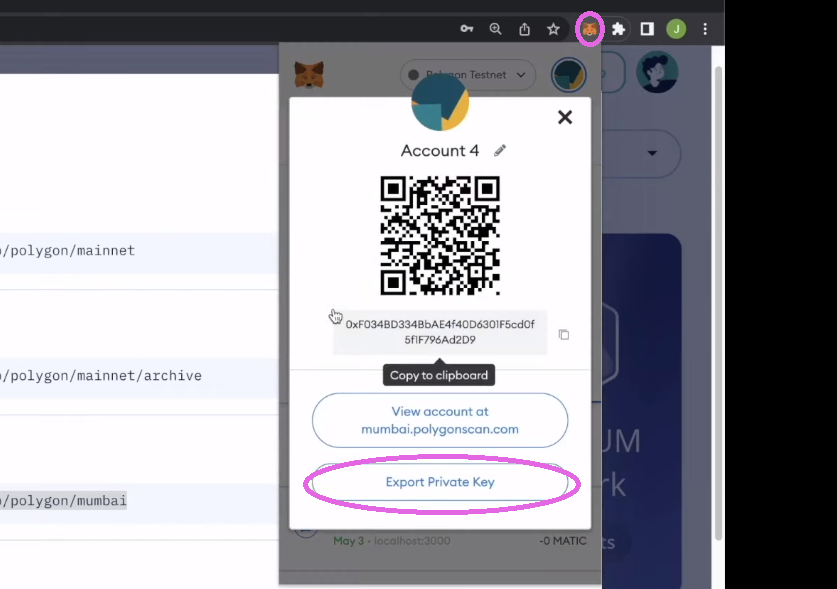
So far as your pockets’s personal key goes, you need to use MetaMask to export it:
At this level, you need to have the values for all three above-listed surroundings variables prepared:

Then you definately’ll return to “hardhat.config.js” for some closing tweaks (21:10):
Lastly, beginning at 22:38, the video dapp improvement tutorial beneath will present you the right way to deploy and confirm your contract. As soon as your contract is reside on Mumbai, you’ll be able to work together with it utilizing PolygonScan (23:38):
Dapp Growth Tutorial – Frontend
Together with your good contract reside, you have got the engine of your dapp working. As such, it’s time to create a correct frontend to allow customers to work together together with your good contract. Listed below are the principle levels, which the video beneath will take you thru:
- Initializing the React app (29:01)
- Creating your single web page dapp’s header (30:03)
- Including the coin part (32:26)
- Implementing the vote buttons (38:23)
With the frontend coated, you’re able to make the appliance reside. For that function, it would be best to create a Moralis server (40:12) and duplicate your server’s particulars into the “index.js” file:
Then, beginning at 41:26, you’ll care for the information modal. Nonetheless, you’ll use the highly effective Moralis Web3 API to make sure that the “data” modals embody token costs (47:27).
Dapp Growth Tutorial – Backend
Together with your good contract up and working, your frontend prepared, and your Moralis server spinning, it’s time to finish the final piece of the puzzle. Therefore, it’s essential join your React app to your good contract (50:30). That is the half that may assist you flip your React utility right into a dapp. Happily, you get to do that with out breaking a sweat, because of the Moralis “Sync” characteristic and dashboard.
Beginning at 50:45, this dapp improvement tutorial will present you the right way to create a brand new sync occasion:
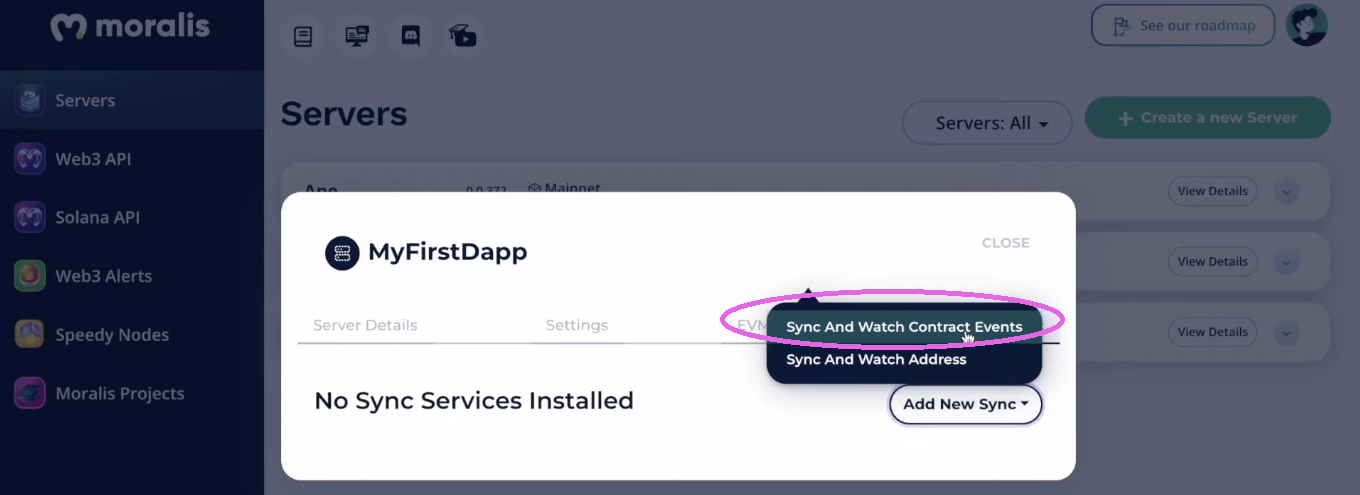
After efficiently creating your new sync, the Moralis dashboard will do the indexing routinely. Moreover, you’ll be able to simply use all the small print associated to your good contract occasions inside your dapp. Therefore, your frontend will get to mirror the reside on-chain information, which is the idea for the proportion sentiment rating.
Upon getting your Moralis server up and working, you get to entry your Moralis dashboard:
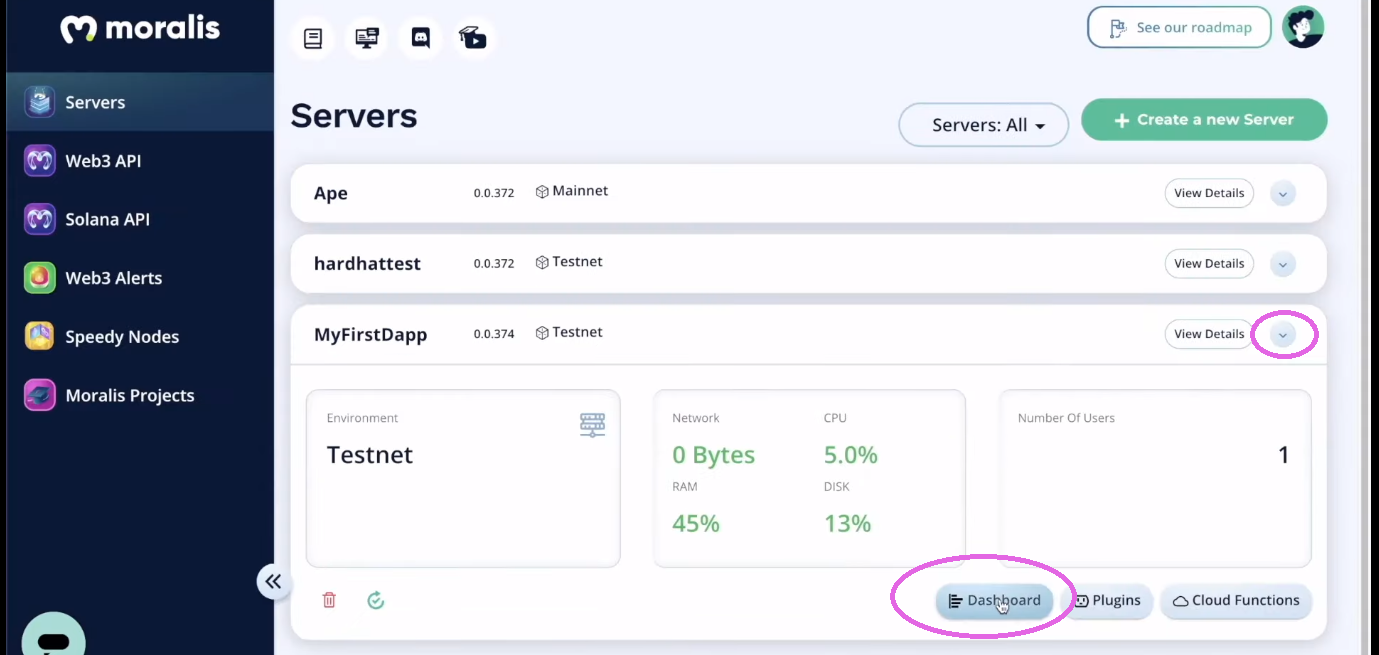
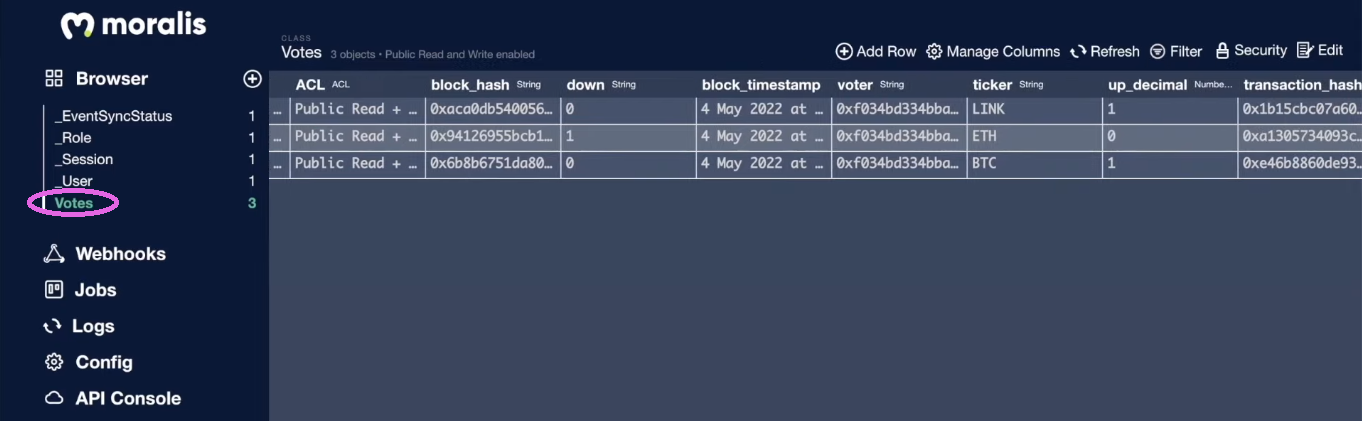
If you happen to used the identical title to your “TableName” contained in the “sync” setting, you now have the “Votes” class in your Moralis dashboard:
Dapp Growth Tutorial – Full Information to Constructing a Dapp – Abstract
We should admit that this dapp improvement tutorial was fairly intensive. But, it nonetheless acquired you thru all of the steps in lower than 70 minutes. It coated all essential components of dapp improvement – the good contact, the frontend, and the backend. As such, you now have a full image of the method behind Web3 utility improvement. If you happen to loved this tutorial, we suggest you try our “clone” dapp improvement tutorials:
Alternatively, you may wish to begin with easier instance tasks. Maybe, you wish to keep away from coping with good contracts for now. If that’s the case, you must create your individual dapp in minutes utilizing the final word Web3 boilerplate. Or, create a cellular Ethereum dapp utilizing our Ethereum cellular boilerplate. Furthermore, you’ll find many different easy dapp improvement tutorials on the Moralis YouTube channel and the Moralis weblog. A few of the newest articles concentrate on blockend improvement, the right way to authenticate Solana customers with the Phantom pockets, the right way to create an NFT on-chain stock system, SPL vs ERC20 tokens, constructing a DAO, and the right way to mint sport asset as NFTs. Furthermore, there best method to grow to be a blockchain developer is correct at Moralis Academy.
[ad_2]
Source link


