

[ad_1]
Have you learnt your approach round Unity? If that’s the case, you’re already geared up to change into a Web3 developer and sort out Web3 sport improvement. Do you know that that is all it’s good to additionally create a Web3 map sport. In fact, there are a number of transferring elements and setups concerned in finishing such a mission. Nonetheless, while you use the fitting instruments, issues are a lot less complicated than anticipated. That is the place Moralis, the last word Web3 improvement platform, makes a world of distinction. Its Unity SDK permits you to effortlessly incorporate Web3 performance, beginning with Web3 authentication. Moreover, due to Moralis’ final Web3 APIs, you get to do a lot of the heavy lifting with single singles of code. Whereas Unity lets you create a lovely frontend, Moralis takes care of the blockchain-related backend. This contains dealing with the on-chain and off-chain knowledge, speaking with good contracts, and rather more.
Transferring ahead, we are going to take a more in-depth take a look at our Web3 map sport. We’ll begin with a fast demo of this instance sport in an effort to resolve if you wish to get your fingers soiled. Then, we’ll present you learn how to full all the required setup in each Moralis and Unity. Furthermore, our Web3 map sport makes use of NFTs (non-fungible tokens) to characterize the properties in our sport. Thus, we’ll additionally present you learn how to deploy a sensible contract to mint in-game NFTs. That is the place you’ll study extra about Hardhat and the way it simplifies the deployment of Web3 contracts. Moreover, we are going to take a more in-depth take a look at the principle script to give you further perception into how our Web3 map sport works. In fact, you’ll have the ability to use our code, which awaits you on GitHub. So, create your free Moralis account to observe alongside!
Our Web3 Map Recreation Demo
Not all elements of our sport are occurring on-chain; nonetheless, we nonetheless determined that solely authenticated customers can play. As such, our Web3 map sport begins with the next screens:

Customers that wish to proceed, must click on the “Authenticate” button. Subsequent, they should click on the “Join” button:

Then, the sport shows the login QR code:
That is the place customers want to make use of their WalletConnect-compatible Web3 cellular wallets to scan the code. Furthermore, additionally they want to verify their Web3 login inside their cellular wallets:

As soon as customers are logged in, they see the principle menu:

And, it’s the “View Map” button that may take them to the core of the sport. By default our map targets Manhattan:

The inexperienced pin signifies the middle level of the map. Nonetheless, customers can merely transfer the map round by click-and-drag mouse motion and zoom in or out with a mouse scroll. Furthermore, within the bottom-right a part of the display screen, there are numerous command buttons. If gamers wish to add a property, they should click on the plus button:

After they click on the plus button a constructing seems on the display screen (see the picture above). Then customers get to pan the map to have the constructing hovering on high of the land the place they wish to place their property. They try this by clicking the “Settle for” button. In fact, they will additionally cancel their motion. However, gamers also can delete properties. In that case, they should choose an current constructing and click on the minus button:

That’s the gist of our Web3 map sport. For a extra detailed demonstration, take a look at the video on the backside of the article.
Should you discovered the above demo attention-grabbing, we invite you to roll up your sleeves and observe our lead. As talked about within the introduction, apart from cloning our mission, you additionally want to finish some preliminary setup. Therefore, we are going to first present you learn how to full the preliminary Moralis setup. Additionally, now could be an ideal time to just be sure you have the next instruments prepared:
- Unity
- Node JS
- MetaMask (cellular and internet)
- Visible Studio Code (VSC) or your most popular code editor
Furthermore, we are going to deal with the Polygon’s testnet (Mumbai) for this instance mission. The latter is a well-liked EVM-compatible testing chain that has very low transaction charges. Moreover, you’ll be able to make the most of the Polygon faucet with a view to get hold of some check MATIC. As such, we may also present you learn how to simply add the Mumbai community to your MetaMask and learn how to use the Polygon faucet. Subsequent, we are going to present you learn how to use Hardhat to create, compile, deploy, and confirm a quite easy ERC721 good contract. With the preliminary setup beneath your belt and your good contract deployed, we’ll lastly deal with Unity. That is the place you’ll study the place to enter your Moralis dapp’ credentials. Furthermore, we may also do a extra detailed code walkthrough to supply further context.
Preliminary Moralis Setup
- In case you haven’t completed so but, create your free Moralis account now. However, use your credentials and log in:

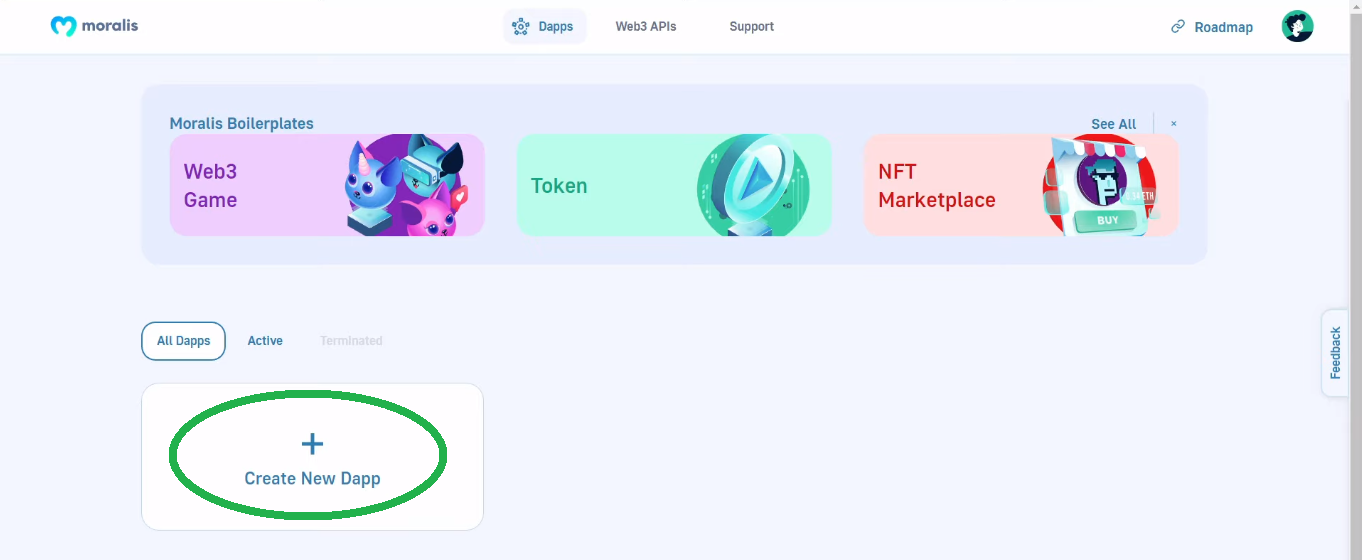
- Inside your Moralis admin space, use the “Create New Dapp” button:
- On step one of the “Choose Setting” pop-up window, select the “Testnet” possibility:

- Subsequent, choose the “Polygon Mumbai” community and make sure your choice by clicking the “Proceed” button:

- Then, select the town closest to your location and transfer ahead by clicking the “Proceed” button once more:

- Lastly, it’s good to title your dapp. Since this may be something, you may be as inventive as you need. Although, you may also observe our lead and go together with “test-dapp”. With the title in place, begin your Moralis dapp by clicking “Create Your Dapp”:

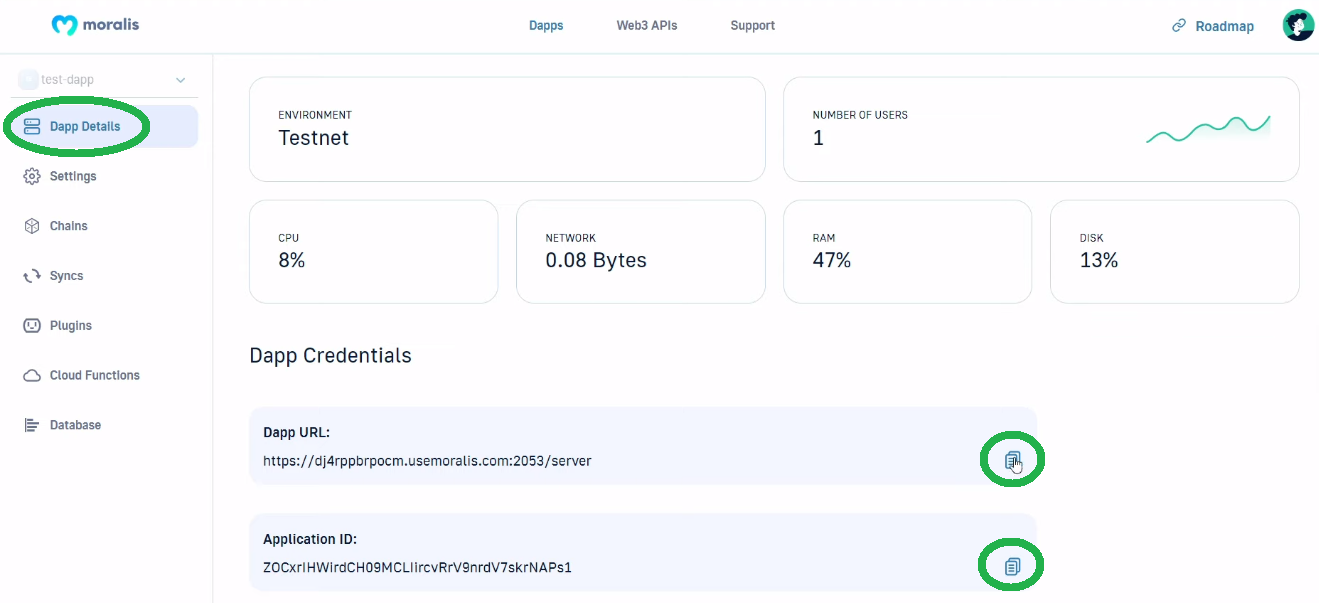
- As soon as your dapp is up and working, you entry all its particulars and options by way of the “Settings” button:

- That is the place you discover the credentials that you just’ll want to stick into Unity after cloning our code:
Including Mumbai to Your MetaMask and Getting Play MATIC
At this level, you need to have your MetaMask browser extension put in and your Web3 pockets prepared. Therefore, you’ll be able to simply add the Mumbai community. Utilizing the identical “Setting” button as above, you get an opportunity to entry the “Networks” tab:

As indicated within the screenshot above, click on the “Settings” button subsequent to “Polygon Mumbai), which can open that community’s particulars. And, that’s the place you’ll see the “Nodes” part:

All it’s important to do is click on the “Add to Metamask” button and make sure this motion in your MetaMask.
With the Mumbai community added to your MetaMask, you’re able to get hold of some play MATIC. As such, go to the Polygon Faucet web site:

There, it’s good to choose the “Mumbai” community and “MATIC Token”, paste your pockets deal with (copy it out of your MetaMask), and hit “Submit”:

Our Good Contract for a Web3 Map Recreation
Earlier than transferring on, go to GitHub and clone or obtain our instance mission:

In relation to utilizing Hardhat to handle good contracts, we’ve got created a particular file with step-by-step directions. Yow will discover the “Directions.txt” file contained in the “SmartContracts” folder. This file incorporates the next steps:
- Set up Node JS
- Create an empty folder outdoors of GIT. Open in a textual content editor (e.g.: VSC)
- Use your command line to put in Hardhat. These are the command it’s good to enter:
npm i -D hardhat
npx hardhat - Use your command line to put in Hardhat. These are the command it’s good to enter:
npm i -D @openzeppelin/contracts
npm i -D @nomiclabs/hardhat-waffle
npm i -D @nomiclabs/hardhat-etherscan - Rename “./contracts/Greeter.sol” to “./contracts/{YourContractName}.sol” (with out “{}” in fact)
- Change “./scripts/sample_script.js” to “./scripts/deploy{YourContractName}.js” (once more with out “{}”)
- Inside “./scripts/deploy{YourContractName}.sol”, rename “Greeter” to {YourContractName} and “greeter” to {yourContractName} (respect current letter-casing)
- In “./scripts/deploy{YourContractName}.sol”, make sure the “deploy()” operate has the right contract constructor parameters
- Inside “./scripts/deploy{YourContractName}.sol” add the code blow (exchange {YourContractName} with an precise title):
await {YourContractName}.deployTransaction.wait(5);
// We confirm the contract
await hre.run(“confirm:confirm”, {
deal with: {YourContractName}.deal with,
constructorArguments: [],
});
- In “./hardhat.config.js”, add this line of code on the high:
require(“@nomiclabs/hardhat-etherscan”);
- Inside “./hardhat.config.js”, add these fields earlier than “module.exports” half:
const PRIVATE_KEY = “”;
const MUMBAI_NETWORK_URL = “”;
const POLYGONSCAN_API_KEY = “”;
- In “./hardhat.config.js”, modify “module.exports”:
module.exports = {
solidity: “0.8.7”,
networks: {
mumbai: {
url: MUMBAI_NETWORK_URL,
accounts: [PRIVATE_KEY]
}
},
etherscan: {
apiKey: POLYGONSCAN_API_KEY
}
};
- Use these instructions to compile your good contract:
- npx hardhat clear
- npx hardhat compile
- Deploy your good contract with this command:
- npx hardhat run scripts/deployProperty.js –community mumbai
Observe: You can too use the video beneath (16:11).
An ERC721 Good Contract
Since you’ll be able to merely copy our good contracts, there’s no must know Solidity to construct your Web3 map sport. Nonetheless, if you’re eager about studying extra particulars about our ERC721 good contract, use the video beneath, beginning at 21:32. That is the place you’ll learn the way this contract lets you use on-chain or off-chain storage.

Furthermore, after deploying your contract, you’ll get your good contract’s deal with and ABI within the terminal:

Nonetheless, you may also view all of your contract’s particulars on Polygonscan (27:53):

A Web3 Map Recreation and Unity
Begin by opening our instance mission in Unity. Then, you should use “Learn me” to view all the things it’s good to know (28:38):

At this level, our Web3 map sport’s Web3 performance will not be but at your disposal. To incorporate that, it’s good to join it with the Moralis’ SDK. Therefore, now’s the time to repeat your Moralis dapp’s credentials (step eight from the “Preliminary Moralis Setup” part) into the “Moralis Web3 Setup” window:
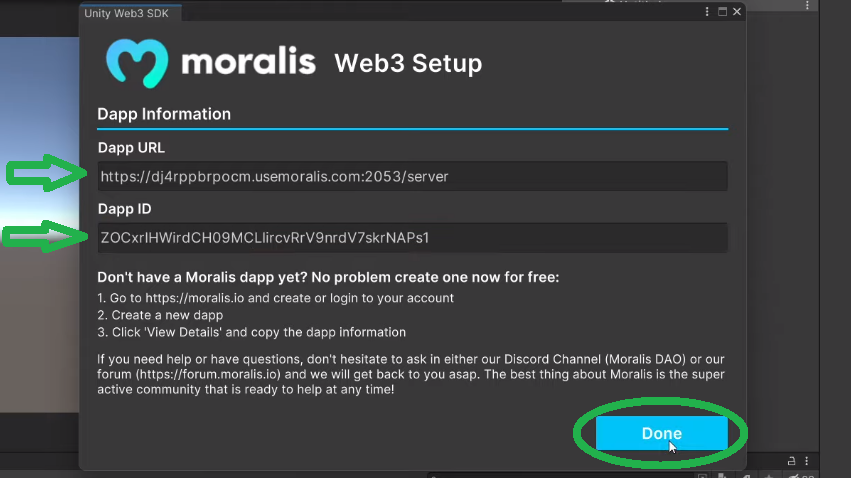
In case, the above window didn’t open for you routinely, you’ll be able to entry it by way of “Window > Web3 Unity SDK > Open Web3 Setup”:

Subsequent, deal with “SimCityWeb3Configuration.asset”. Ther, you’ll see that by default, our mission is ready to work with off-chain knowledge:

The “Web3ContractService” Script
Nonetheless, to make this instance sport into a correct Web3 map sport, you wish to change the above choice to “Contract”. For a more in-depth take a look at the “SimCityWeb3ServiceFactory” script, use the video beneath, beginning at 34:30. Nonetheless, we wish to deal with the “SimCityWeb3ContractService” class. In case you wish to code it your self, you’ll be able to observe together with our in-house professional within the video beneath (35:05). That approach you’ll get probably the most out of this mission and learn to manually implement all of the performance that the above-deployed good contract affords. That is additionally the place you’ll see the ability of Moralis firsthand and the way hooks like “GetNFTOwners” make a world of distinction.
However, you should use our completed code and simply present your contract’s deal with and ABI. That is the place the “PropertyContract” class enters the scene. As such, that is the one piece of code it’s good to replace:
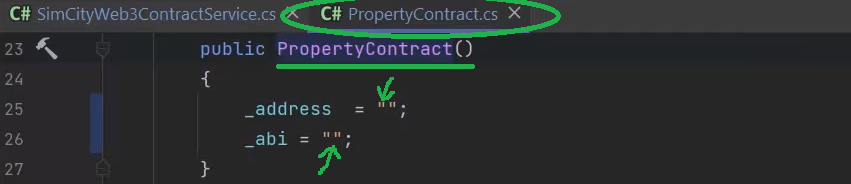
So, simply paste the 2 values (both copy them out of your terminal or Polygonscan) and put it aside:

By pasting in your good contract’s particulars, your model of our Web3 map sport is totally useful. As such, you’ll be able to run it your self and mess around. You’ll see that including and eradicating properties are actually on-chain transactions that you just’ll want to verify together with your Web3 pockets:

Observe: The best way we designed our mission required on-chain transaction affirmation utilizing a cellular Web3 pockets. We may additionally design it as a WebGL mission, through which case gamers may affirm transactions with their internet browser MetaMask extensions.
Lastly, right here’s the video tutorial we’ve been referencing all through the article:
How you can Construct a Web3 Map Recreation – Abstract
At this level, you already know that due to Moralis, making a Web3 map sport is by no means difficult. That’s notably true when you determined to repeat our code. Nonetheless, even if you’re ranging from scratch, with Moralis’ Unity SDK, you get to avoid wasting a ton of precious improvement time. And, by finishing the above instance mission, you realized learn how to full the preliminary Moralis setup and learn how to get hold of your dapp’s credentials. As well as, you additionally realized learn how to add the Mumbai chain to your MetaMask and learn how to get some play MATIC. As such, you are actually able to sort out your personal tasks.
However, you would possibly want some further apply to get extra comfy with Unity Web3 programming. In that case, we encourage you to make use of the Moralis’ YouTube channel and the Moralis’ weblog. These two retailers host many different Unity Web3 instance tasks. Moreover, there are various instance tasks and subjects that target different crypto subjects as effectively. As an example, our newest articles present you learn how to do NFT on-chain evaluation, cope with the on-chain knowledge, or learn to start producing NFTs in mere minutes.
Furthermore, if you’re eager about going full-time crypto sooner quite than later, Moralis Academy may be the place for you. There, you’ll be able to enroll in an unlimited vary {of professional} blockchain improvement programs. As such you’ll be able to find out about particular crypto niches and most respected blockchains from consultants. As well as, that is additionally the place to get a customized examine path, mentorship, and membership in a tremendous neighborhood.
[ad_2]
Source link


