

[ad_1]
Earlier than we present you the way to run a sensible contract with Unity, we need to remind you that Web3 improvement affords numerous alternatives. Thus, those that give attention to constructing Web3 purposes would be the ones to come back on high. Particularly those that get entangled early, when bridging Web2 and Web3 is simply getting began. Nonetheless, during the last couple of years, the Web3 stack got here a good distance. Therefore, you not have to cope with the restrictions or RPC nodes. Which means you shouldn’t have to run your individual nodes, nor do it is advisable construct your individual backend infrastructure. As a matter of truth, you need to use Moralis to run a sensible contract with Unity. Thus, you get to create all types of decentralized purposes (dapps). Basically, Moralis permits you to exploit the present Web3 backend infrastructure. Therefore, you may give attention to creating the perfect frontend.
In immediately’s article, we’ll tackle a easy instance mission to indicate you the way to run a sensible contract with Unity. With that data, you’ll have the ability to take your Unity expertise and begin delivering killer Web3 video games. Nonetheless, earlier than diving into the instance mission, we have to make it possible for we’re all caught up with the fundamentals. As such, we’ll first let you know what a sensible contract is. Furthermore, for these of you who aren’t aware of Unity, we may even shortly clarify what Unity is. Moreover, since there are a number of helpful instruments it is advisable run a sensible contract with Unity, you’ll study rather a lot should you determine to observe our lead. You’ll discover ways to use Hardhat to compile, deploy, and confirm sensible contracts. As well as, you’ll learn how to begin utilizing Moralis and the way to work on Polygon’s testnet.
What’s a Good Contract?
Good contracts, also referred to as Web3 contracts, are mainly items of software program working on programmable blockchains. And, since Ethereum was the primary programmable chain, it was the Ethereum chain that gave delivery to those superb applications. On the subject of Ethereum and different EVM-compatible chains (e.g.: Polygon, BNB Chain, Avalanche), Solidity is the programming language devs use to jot down sensible contracts. However, within the case of Solana, sensible contracts are known as applications and devs write them in Rust.

Moreover, sensible contracts are there to make sure that issues run correctly – in response to predefined guidelines. So, sensible contracts execute predefined actions when predetermined circumstances are met. By doing so, they emit so-called sensible contract occasions. By listening to the sensible contracts occasions, we will use them as triggers for different options and performance inside dapps. As such, it’s apparent that sensible contracts are the logic of programmable chains. Furthermore, our tasks can name features from sensible contracts to work together with the blockchain. And, that’s precisely how we run a sensible contract with Unity. After calling the operate from sensible contracts, it communicates again utilizing return values and occasions.
Nonetheless, earlier than we will use a sensible contract (except we’re utilizing an current one), we have to deploy it. Meaning we have to execute an on-chain transaction that shops the contract in query to a specific chain. In fact, there are a number of methods to deploy sensible contracts. Although, we consider Hardhat is likely one of the easiest and neatest methods to cowl that side. As such, we’ll use this software as we transfer ahead. Now, earlier than we have a look at a diagram of calling sensible contracts from Unity, let’s guarantee everyone knows what Unity is.

What’s Unity?
Since its launch again in 2005, Unity has come a good distance. It’s now one of the vital well-liked recreation engines. Furthermore, Unity is all about cross-platform, which suggests you need to use it to develop all types of purposes. Whether or not you’re concentrating on desktops, cell, console, or digital actuality (VR) platforms, Unity can assist you get to the end line.
The Unity’s interface lets you get far with out coding. Nonetheless, when issues get critical, scripts get issues executed. That is the place C# and C++ expertise turn out to be useful. All-in-all, if you’re interested by recreation improvement, Unity deserves your consideration. Furthermore, since Web3 recreation design has excellent potential, utilizing Unity to create killer Web3 video games is a no brainer.
Calling Good Contracts from Unity
As promised above, let’s have a look at how calling sensible contracts from Unity works utilizing the next diagram:

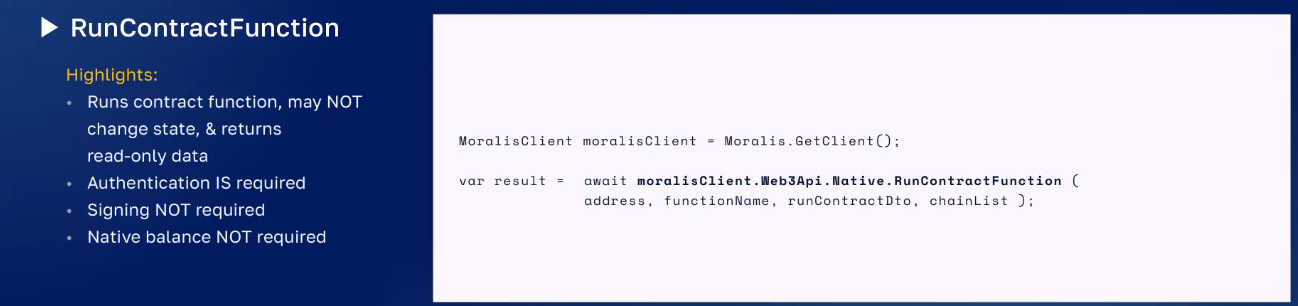
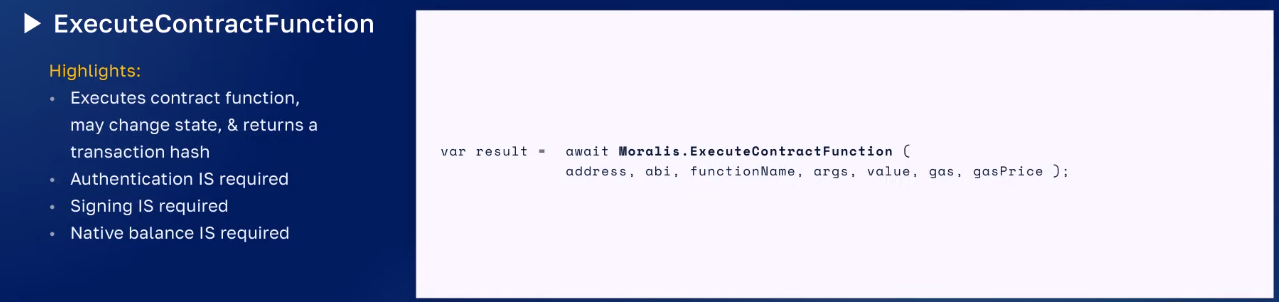
Trying on the picture above, you may see that we first have to deploy our sensible contract. Then, you (as a Unity person) are capable of run contract features in read-only mode. In response to that operate, the sensible contract returns the specified kind. Furthermore, you can even execute contract features, through which case you’ve gotten learn and write capabilities. Moreover, there’s no return worth in response to “ExecuteContractFunction”. As a substitute, in that case, the sensible contract returns the transaction hash. Nonetheless, the contract itself is ready to emit occasions if and when it desires to. And with Unity, you may subscribe to these occasions to look at and seize returned values.
Now, the query is “how will we name “RunContractFunction” and “ExecuteContractFunction”?”. That is the place Moralis enters the scene.
Calling sensible contracts with Moralis:
- “RunContractFunction”:
- “ExecuteContractFunction”:
With the fundamentals of sensible contracts and Unity below our belts, we will give attention to an instance Unity mission. Shifting ahead, we’ll give attention to two scenes – “RunContractFunction” and “ExecuteContractFunction”. We made that mission accessible for you on GitHub. Moreover, because the names of the scenes counsel, our instance mission is all about working an instance sensible contract with Unity. Meaning you’re going to get to see the above-presented read-only and skim/write options firsthand. Furthermore, by this level, you already know that executing contract features requires native stability. Therefore, we may even have to get some “take a look at” MATIC to execute these transactions on the Mumbai community.
Nonetheless, earlier than we will run a sensible contract with Unity, we have to deploy it first. As talked about earlier than, we’ll do that on the polygon’s testnet (Mumbai). Furthermore, we’ll use Hardhat to finish that activity. If that is the primary time you’re listening to about Polygon, ensure to look at the video under, beginning at 3:45. That is additionally the place you may study extra about Polygon Taps, notably in regards to the Polygon Mumbai testnet faucet. The latter will provide help to receive “take a look at” MATIC, which you have to to deploy your sensible contract and execute contract features.

Good Contract Workflow
Step one of the sensible contract workflow is to jot down the sensible contract. Fortunately, there are open-source platforms, like OpenZeppeling that offer you verified sensible contract templates. As such, you hardly ever want to begin from scratch. Furthermore, on this case, you get to make use of our sensible contract, which you could find contained in the “Belongings” folder:

On the subject of our sensible contract, which you’ll be able to see within the picture above, the “setGreeting” and “geGreeting” strategies are what we’ll give attention to. Since we’re offering you with the contract, you simply want to repeat the code. Then, you arrange Hardhat and use a config file, and a deployment file to deploy the sensible contract. It’s the config file the place you have to to enter some specific values. When you run the deployment file, the contract might be up and working. Therefore, you can be then capable of run that sensible contract with Unity.
That can assist you use Hardhat with minimal friction, use the step-by-step directions under. As well as, you may assist your self with the video under, beginning at 5:55.

Utilizing Hardhat – Step-by-Step Directions
- Set up Node JS
- Create an empty folder outdoors of GIT. Open in a textual content editor (e.g.: VSC)
- Use your command line to put in Hardhat. These are the instructions it is advisable enter:
- npm i -D hardhat
- npx hardhat
- Use your command line to put in Hardhat. These are the instructions it is advisable enter:
- npm i -D @openzeppelin/contracts
- npm i -D @nomiclabs/hardhat-waffle
- npm i -D @nomiclabs/hardhat-etherscan
- Rename “./contracts/Greeter.sol” to “./contracts/{YourContractName}.sol” (with out “{}” in fact)
- Change “./scripts/sample_script.js” to “./scripts/deploy{YourContractName}.js” (once more with out “{}”)
- Inside “./scripts/deploy{YourContractName}.sol”, rename “Greeter” to {YourContractName} and “greeter” to {yourContractName} (respect current letter-casing)
- In “./scripts/deploy{YourContractName}.sol”, make sure the “deploy()” operate has the right contract constructor parameters
- Inside “./scripts/deploy{YourContractName}.sol” add the code under (substitute {YourContractName} with an precise identify):
    await {YourContractName}.deployTransaction.wait(5);

    //confirm the contract
    await hre.run("confirm:confirm", {
        tackle: {YourContractName}.tackle,
        constructorArguments: [],
});- In “./hardhat.config.js”, add this line of code on the high:
require("@nomiclabs/hardhat-etherscan");- Inside “./hardhat.config.js”, add these fields earlier than “module.exports” half:
const PRIVATE_KEY = "";
const MUMBAI_NETWORK_URL = "";
const POLYGONSCAN_API_KEY = "";- In “./hardhat.config.js”, modify “module.exports”:
    module.exports = {
      solidity: "0.8.7",
      networks: {
        mumbai: {
          url: MUMBAI_NETWORK_URL,
          accounts: [PRIVATE_KEY]
        }
      },
      etherscan: {
        apiKey: POLYGONSCAN_API_KEY
      }
}; - Use these instructions to compile your sensible contract:
- npx hardhat clear
- npx hardhat compile
- Deploy your sensible contract with this command:
npx hardhat run scripts/deployProperty.js --network mumbaiBe aware: Make certain to enter the Mumbai community URL, your pockets’s personal key, and your Polygonscan API key in step 12.
Preliminary Moralis Setup
Earlier than transferring on, ensure you open our mission in Unity. Then enter your Moralis dapp’s credentials to realize entry to the Moralis’ Web3 unity SDK. Listed below are the steps it is advisable full:
- Go to Moralis’ official web site and create your free account through the “Begin for Free” button. In case you have already got an energetic account, merely log in utilizing your credentials:

- Inside your Moralis admin space, click on “Create New Dapp”:

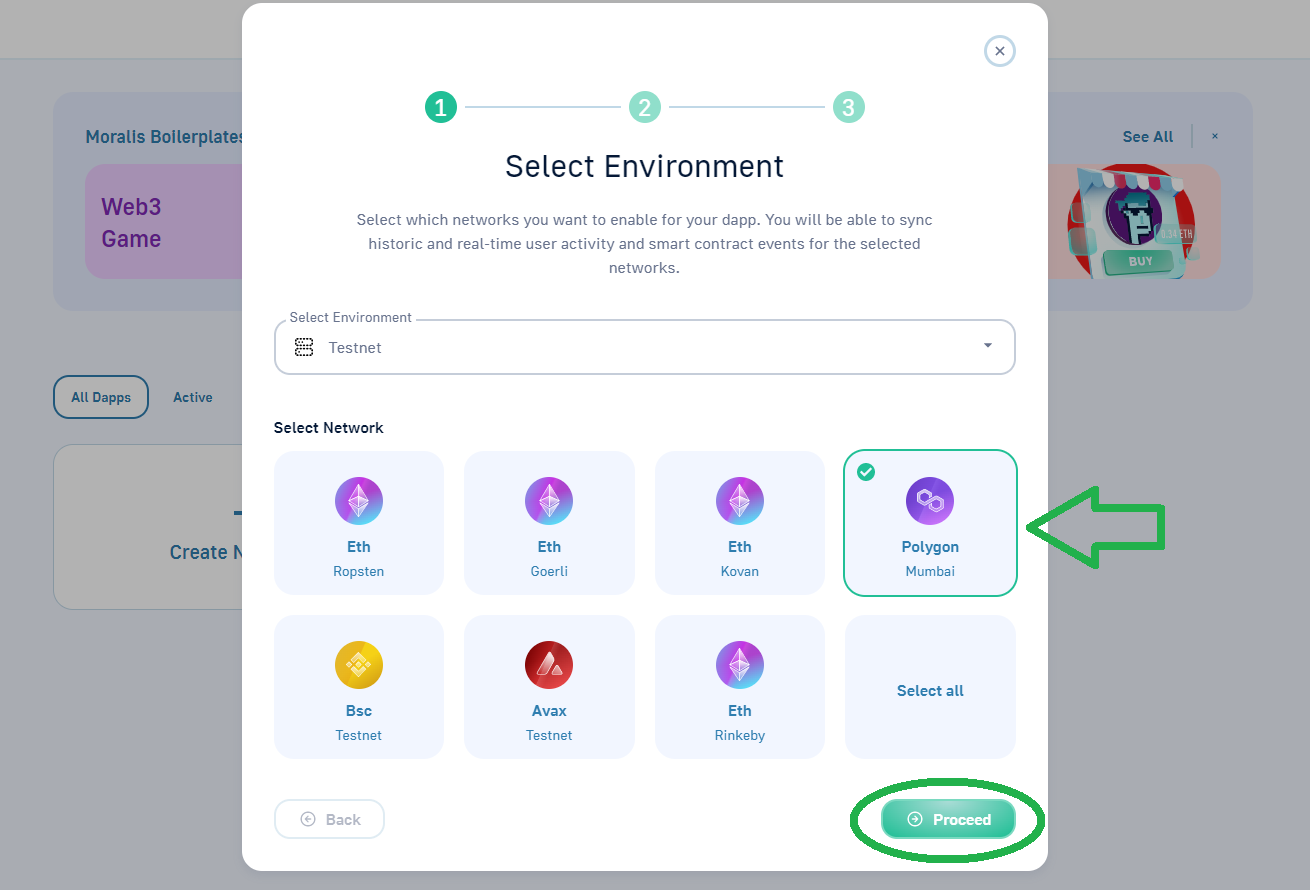
- First, choose the setting. Since that is an instance mission, choose “Testnet”:

- Then, it is advisable choose the chain you need to give attention to. Herein, we’ll give attention to “Polygon Mumbai”:
- Second, it is advisable choose your area. Select the town from the given choices closest to your precise location:

- Third, it is advisable identify your dapp and spin it by clicking the “Create Your Dapp” button:

- Now that your dapp is up and working, you get to acquire its credentials (URL and ID):
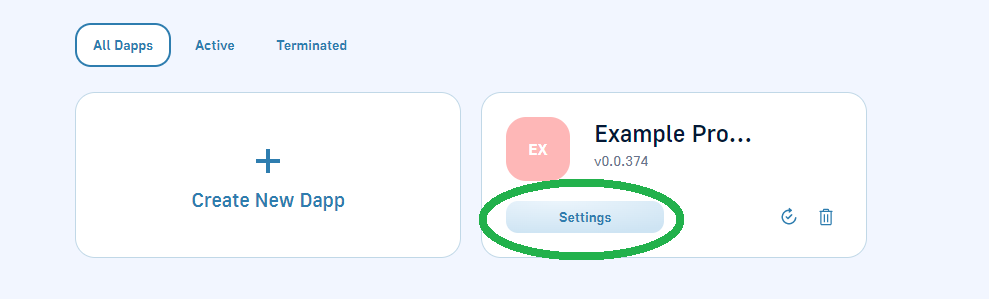
- Use the “copy” icons to repeat your dapp’s credentials:

- Lastly, paste the above-copied credential into Unity and click on “Achieved”:

Be aware: In case you don’t see the “Moralis Web3 Setup” window in Unity, reopen it:

Run a Good Contract with Unity
At this level, you’ve already efficiently deployed your occasion of our sensible contract. That implies that your terminal returned contract particulars (tackle and ABI). As such, you may copy these particulars:

You want to paste the above-copied strains of code into the “GreeterContractData” script (9:00):
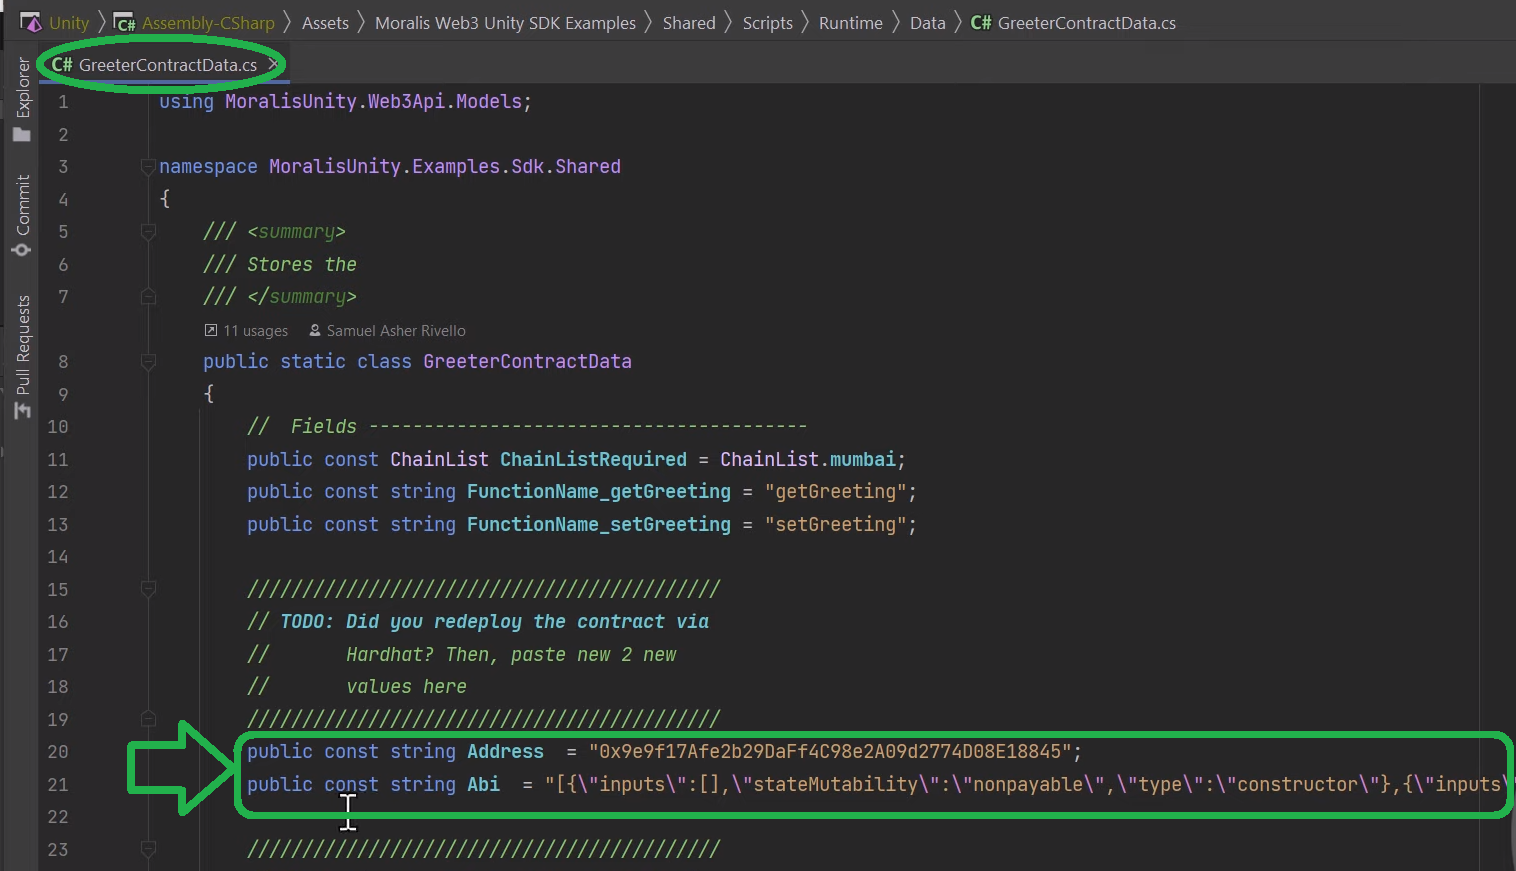
Since “RunContractFunction” accepts the contract ABI within the string format, you may simply paste what the terminal gives. Nonetheless, “ExecuteContractFunction” requires the contract ABI within the object format. This implies it is advisable recreate the string as objects (9:21).
At 9:35 of the video under, you may see the “ExecuteContractFunction” demo. When working this instance scene, you have to to make use of among the above obtained “take a look at” MATIC. However, while you run a sensible contract with Unity through the “RunContractFunction” scene (10:12), you don’t want any funds. Should you keep in mind, that’s as a result of this can be a read-only operate.
Lastly, beginning at 10:25, you can even get a fast code walkthrough for each “run” and “execute” features.
The right way to Run a Good Contract with Unity – Abstract
If you wish to use Unity to develop Web3 video games, figuring out the fundamentals of sensible contracts certain helps. That’s precisely what immediately’s article coated. Except for a easy definition of sensible contracts, you additionally had an opportunity to discover ways to use Hardhat to compile, deploy, and confirm Web3 contracts. Furthermore, should you took on the instance mission that we coated herein, you truly deployed our sensible contract. As well as, you additionally study in regards to the distinction between the “run” and “execute” features. Moreover, utilizing our script and populating it along with your sensible contract’s particulars, you had an opportunity to check run a sensible contract with Unity. Since you probably did that on Polygon’s testnet, you additionally realized the way to receive some “take a look at” MATIC and the way to add the Mumbai community to your MetaMask.
If this was your first rodeo with the Moralis’ Web3 Unity SDK, you could be overwhelmed. As such, we encourage you to undergo the above steps once more or begin with our different Unity tutorials. Yow will discover a ton of beneficial assets about Unity Web3 programming on the Moralis’ YouTube channel and the Moralis’ weblog. These are additionally the shops that may provide help to broaden your crypto horizons and even turn out to be a Web3 developer at no cost. Nonetheless, in case you have an interest in going full-time crypto, you ought to contemplate enrolling in Moralis Academy.
[ad_2]
Source link


