

[ad_1]
At any time when we’re coping with reside knowledge, it is very important someway be certain that we use correct syncing. And, as you almost certainly know, in terms of the blockchain, there’re new on-chain occasions going down on a regular basis. Therefore, you might want to implement dependable Web3 syncing. In case you ran your individual nodes prior to now, you know the way overwhelming and difficult it’s to index the blockchain. Nevertheless, let’s guarantee you that the Web3 tech stack got here a great distance within the final couple of years. As such, there at the moment are instruments at your disposal that allow you to keep away from all the constraints of RPC nodes. With these instruments, you possibly can sync and index sensible contract occasions, which is your ticket to Web3 syncing.
As chances are you’ll know, sensible contracts are kind of on-chain items of software program powering programmable chains (e.g.: Ethereum). Furthermore, Web3 contracts be certain that predefined actions are correctly executed when predefined situations are met. So, the way to simply go about Web3 syncing? Use the last word Web3 improvement platform – Moralis. This Firebase for crypto has a particular “Sync” function that makes the method easy. As well as, because of Moralis’ database, you get to work with on-chain and off-chain knowledge in a single place. Other than this game-changing function, this holistic Web3 backend platform affords you the last word Web3 SDK. Thus, you get to create killer dapps (decentralized purposes) in minutes. And, since Moralis is cross-platform interoperable, you get to grow to be a blockchain developer utilizing your favourite platforms and programming languages.


As an illustration, you should utilize JavaScript or Unity expertise to develop all kinds of net or cellular dapps. Nonetheless, Moralis can be all about cross-chain interoperability, which implies that it future-proofs your work. So, create your free Moralis account right now and begin constructing.
Good Contract Occasions Defined
So as to present you the way to implement Web3 syncing, we should first be certain that you all know the fundamentals. As such, let’s make sure that we’re all on the identical web page concerning what sensible contract occasions are. As talked about within the introductions, sensible contracts are particular units of coded guidelines. These guidelines execute predefined actions as soon as the predetermined situations are met. Furthermore, sensible contracts emit occasions at any time when one thing significant occurs inside them (primarily based on their code). Mainly, sensible contract occasions are some kind of alerts that sensible contracts emit. And, utilizing these alerts, dapps or different sensible contracts can talk. Nevertheless, you must remember that it’s as much as devs of sensible contracts to outline when the occasions ought to happen.
To additional make clear sensible contract occasions, let’s take a look at an ERC-20 token normal sensible contract. The latter emits a “Switch” occasion at any time when somebody sends an ERC-20 token. Moreover, occasions usually comprise extra particulars. Within the case of ERC-20 contract occasions, which means particulars concerning the ERC-20 token transfers. With that stated, it’s fairly clear that real-time Web3 syncing is extraordinarily necessary when growing dapps.
Transferring ahead, we are going to showcase an instance process. We encourage you to comply with alongside and take motion to discover ways to work with Web3 syncing with Moralis.
Web3 Syncing with Moralis
Since NFTs (non-fungible tokens) proceed to be all the fad, we determined to tackle a Web3 syncing process the place we are going to sync and index sensible contract occasions for CryptoPunks. So, let’s presume now we have a dapp, during which we need to observe these NFTs. Therefore, we wish all real-time and in addition all historic knowledge concerning CryptoPunks. Furthermore, this NFT assortment makes use of the ERC-721 token normal. Therefore, there have to be an ERC721 contract operating the present. Moreover, which means we have to apply Web3 syncing to switch occasions of CryptoPunks’ contract. Nevertheless, if you wish to work with Moralis, you might want to first deal with some easy preliminary setup.
Preliminary Moralis Setup
To acquire Moralis’ full backend performance, you might want to create a Moralis server. The latter can be important to sync and index sensible contract occasions. So, listed here are the steps to comply with:
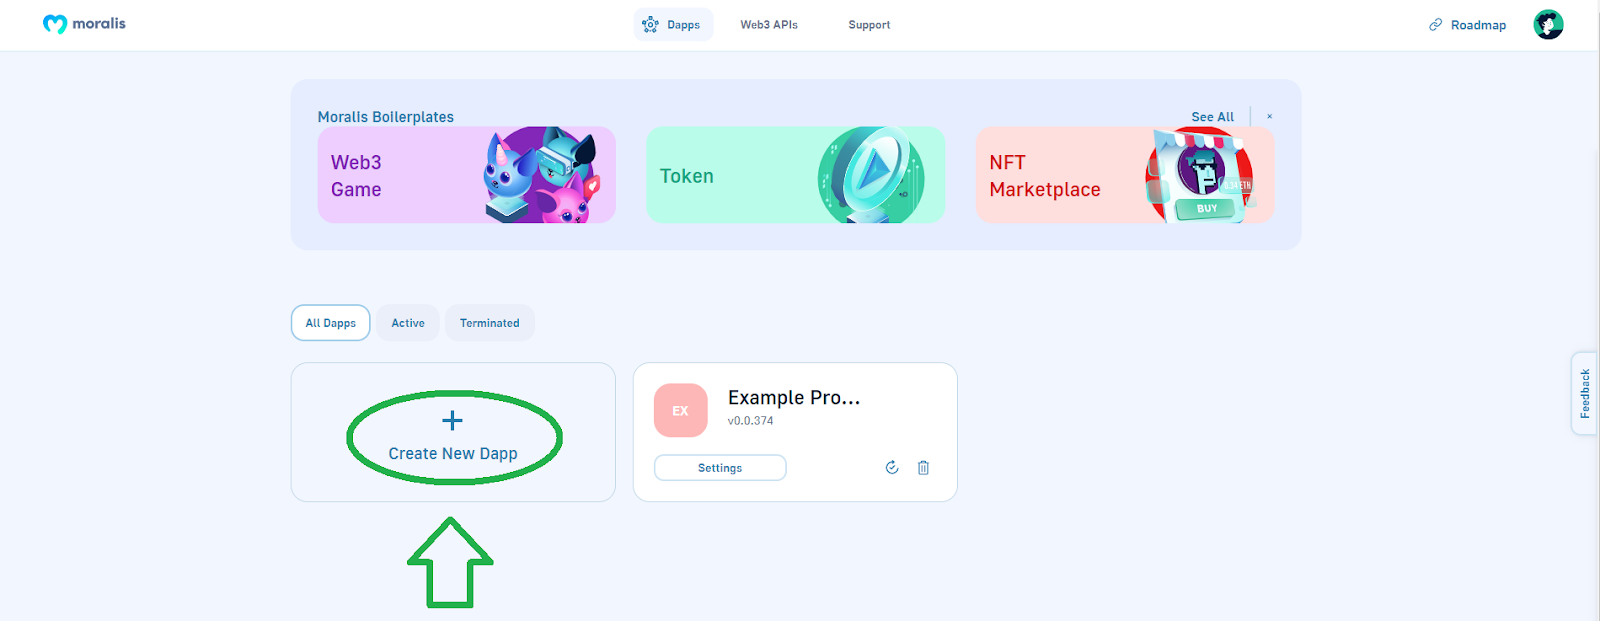
- Create your free Moralis account – Comply with the ”create your free Moralis account” hyperlink within the intro. Nevertheless, in the event you’ve already created your Moralis account, use your credentials and log in.
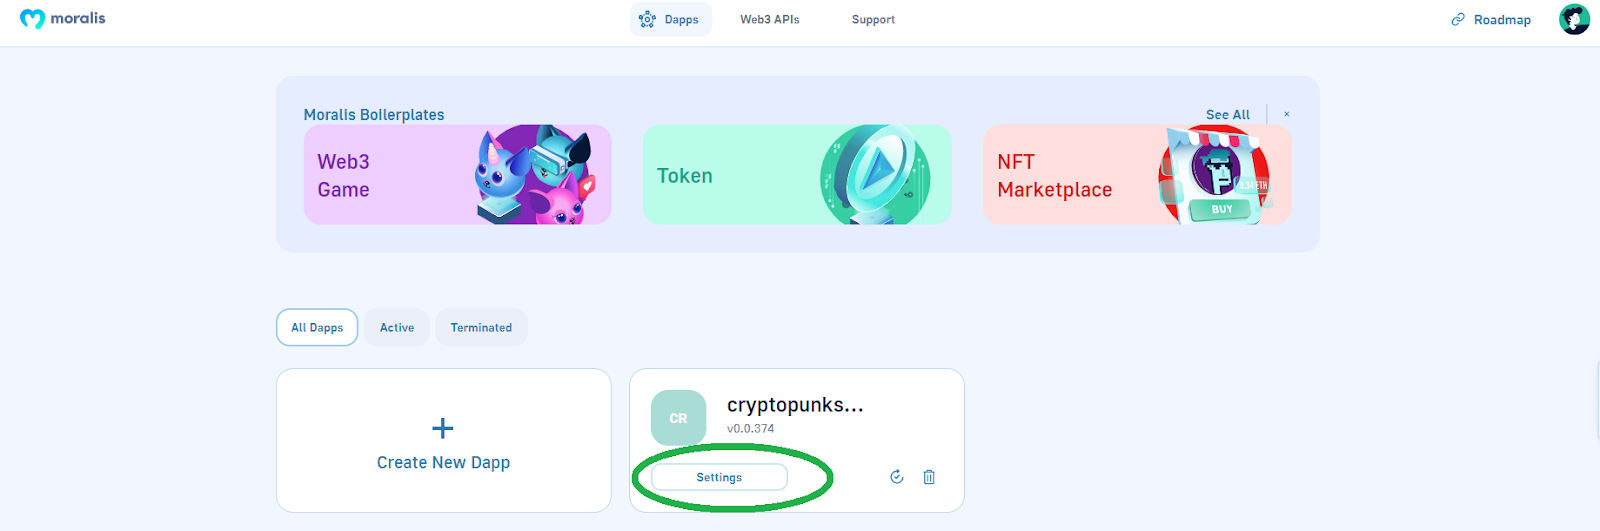
- Create a Moralis dapp – As soon as inside your Moralis admin space, use the “Create New Dapp” button:
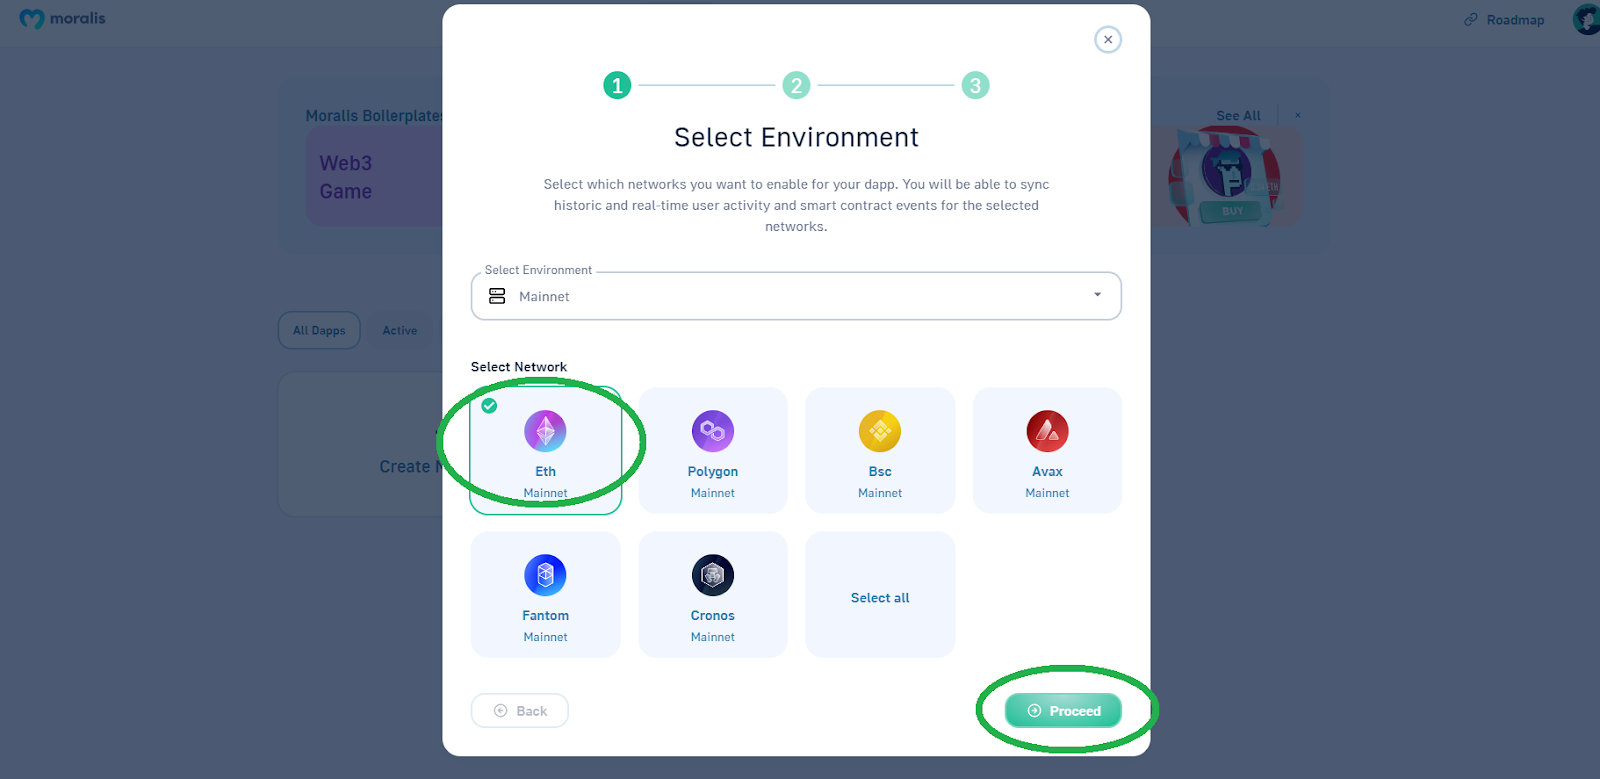
- Choose surroundings – In most instance initiatives, you’ll use testnets (e.g.: Ethereum testnets). Nevertheless, since CryptoPunks is a reside undertaking, you might want to choose “Mainnet”:
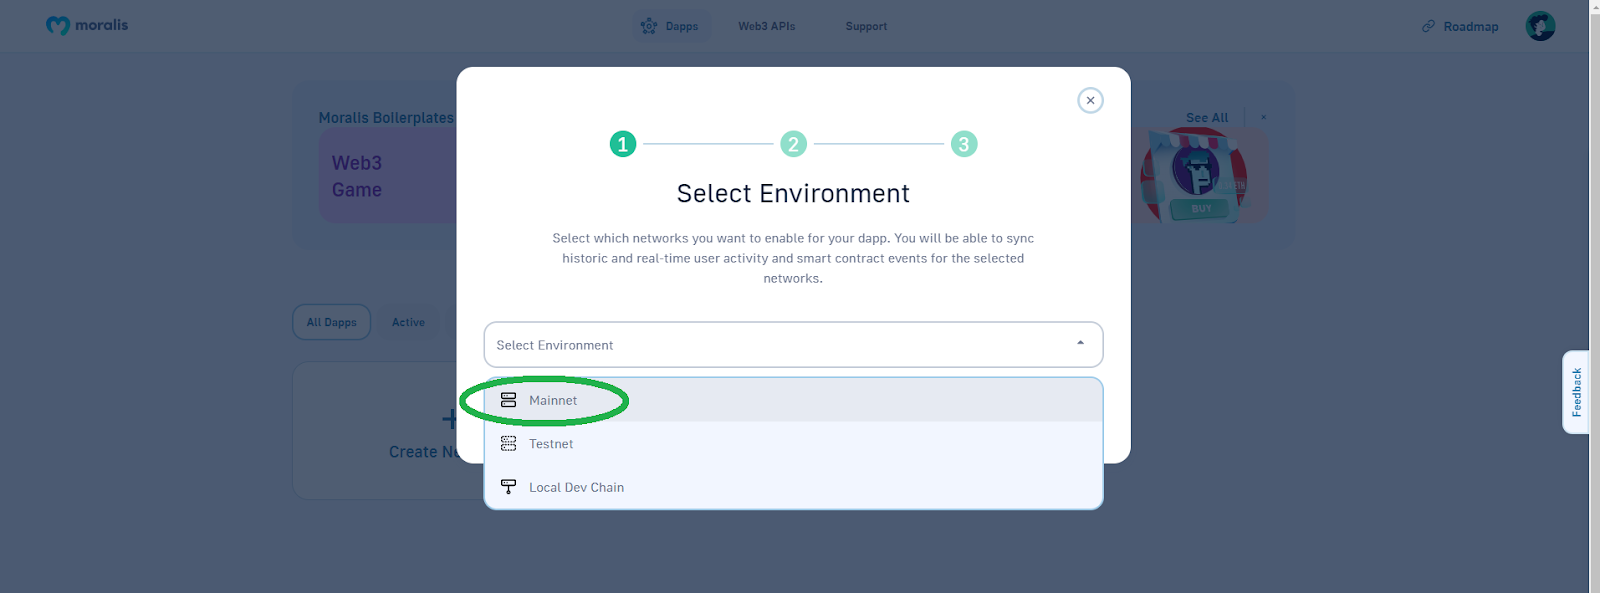
- Select the Ethereum mainnet and proceed:
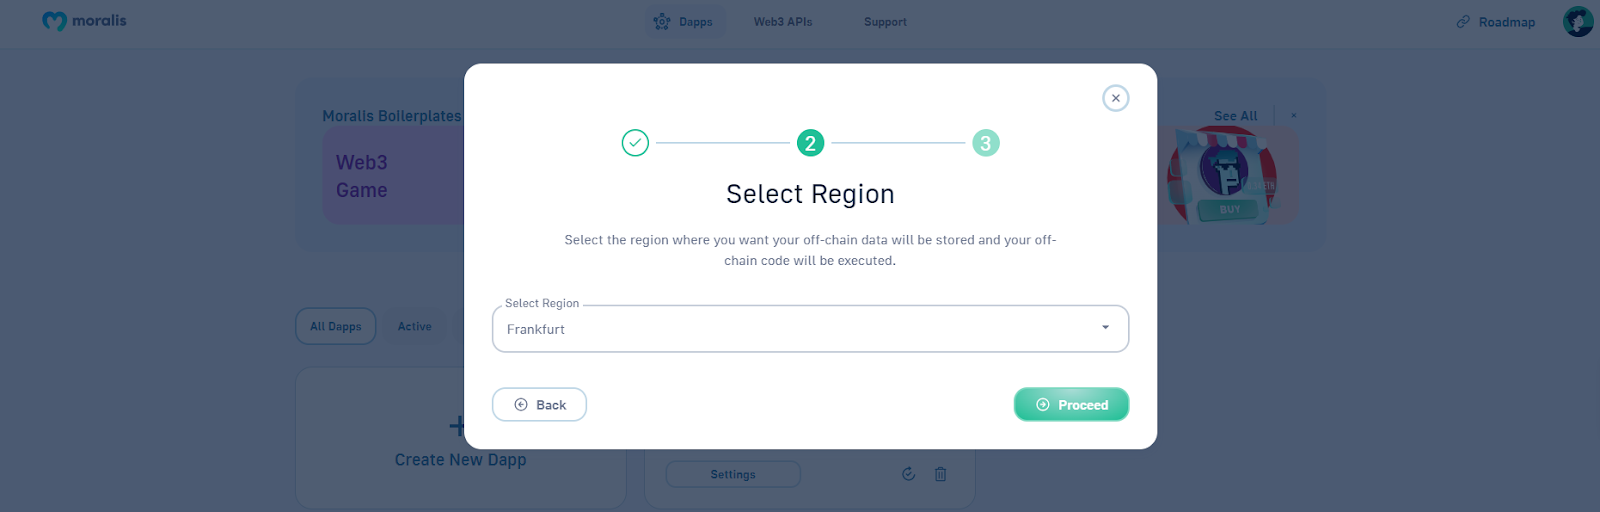
- Choose the town closest to your location:
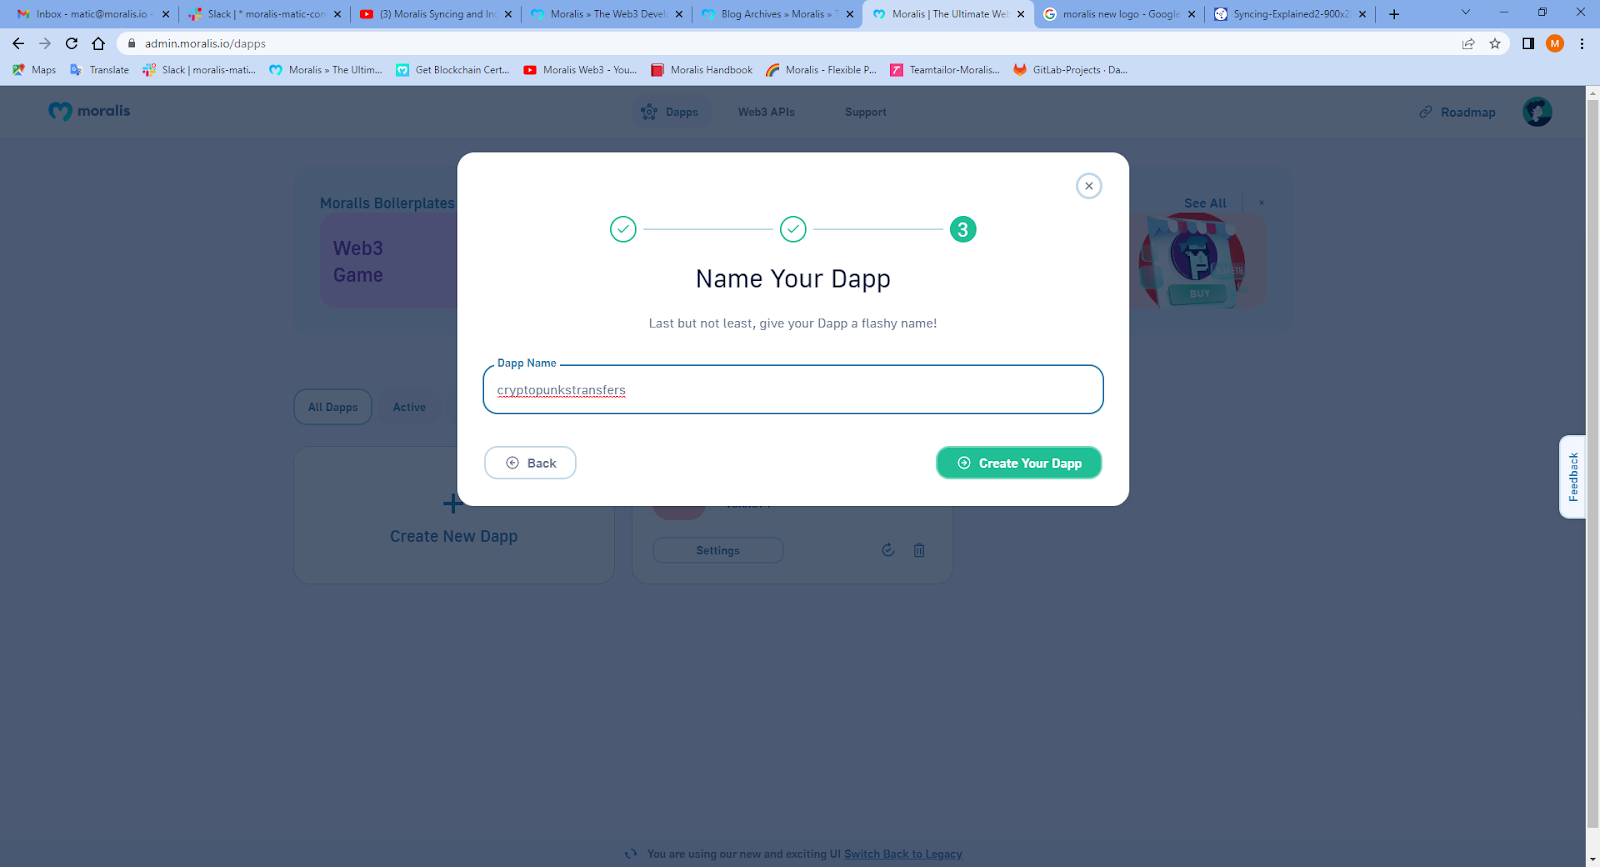
- Identify your dapp and hit the “Create Your Dapp” button:
The above steps are your ticket to accessing the ability of Moralis. When you’ve efficiently created your Moralis dapp, you can begin using its instruments. And, as promised beforehand, to deal with Web3 syncing, we are going to concentrate on the Moralis’ “Sync” function.
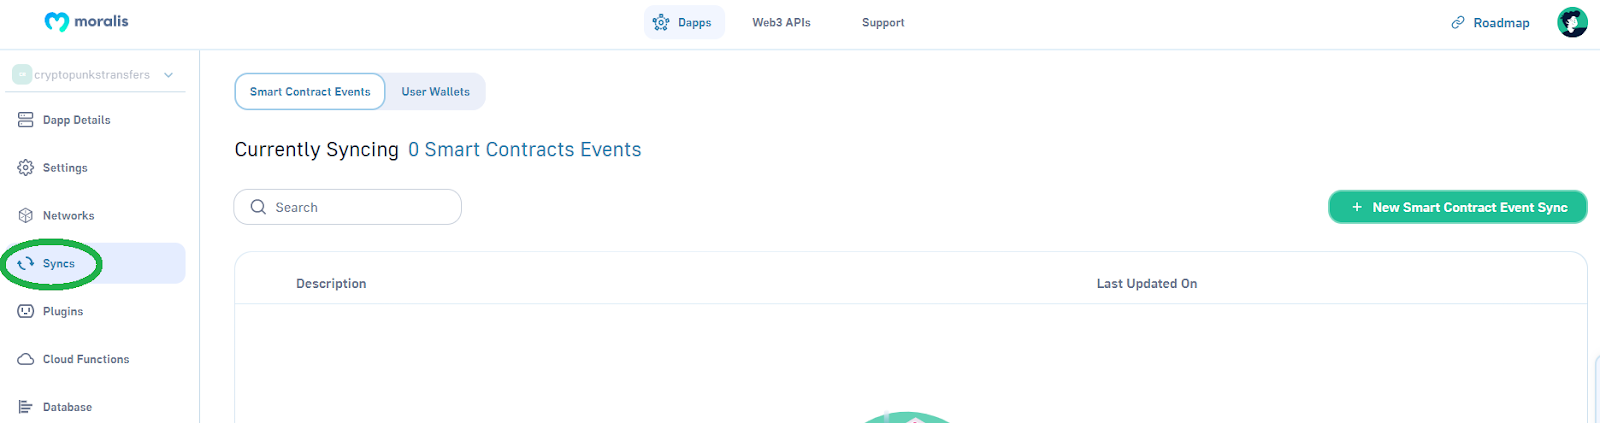
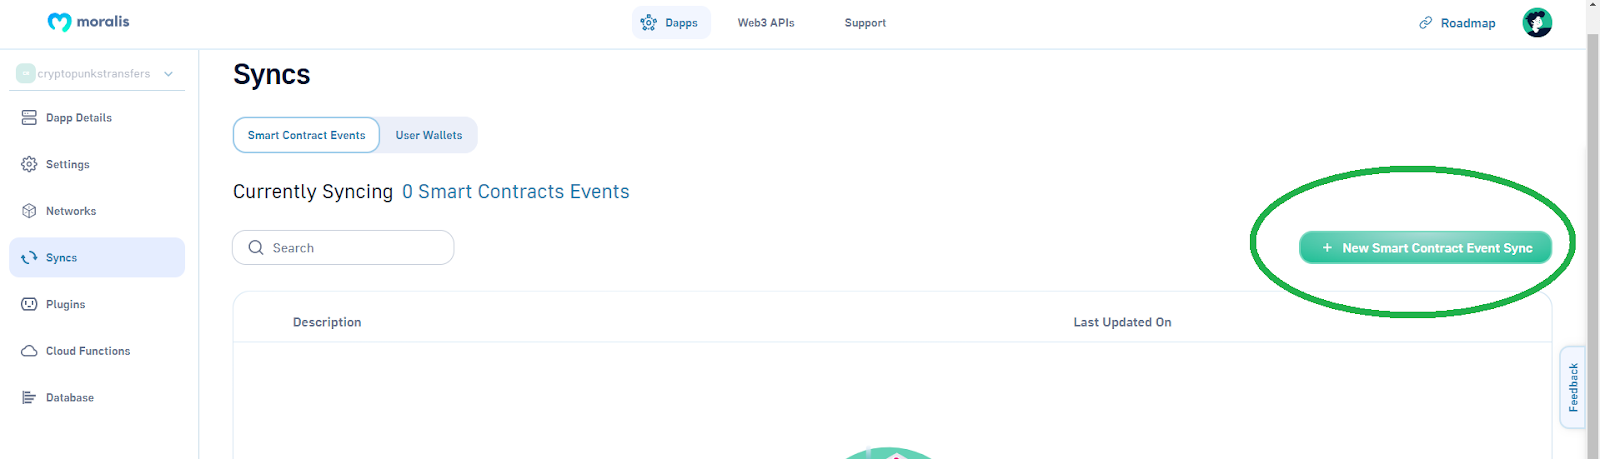
To do Web3 syncing with Moralis, click on the “Settings” button beneath the above-created dapp:

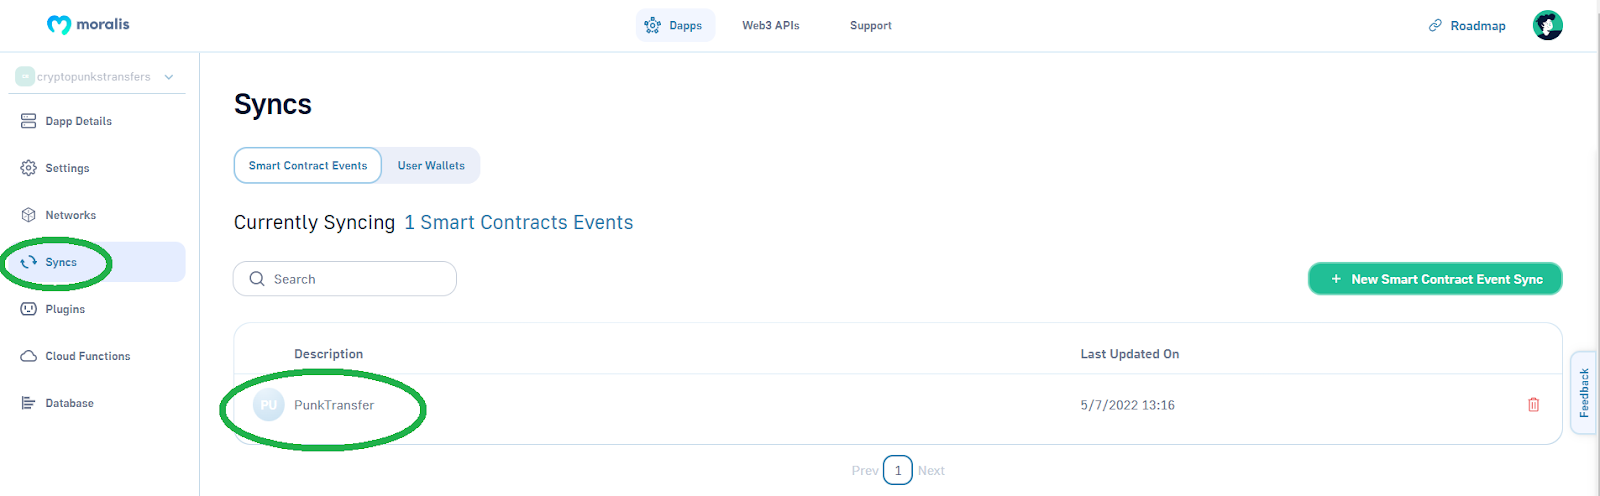
Subsequent, you might want to choose the “Syncs” tab from the sidebar:
As soon as on the “Syncs” tab, click on the “New Good Contract Occasion Sync” button:
Subsequent, you may have two choices – you possibly can both go along with “Customized Occasion” or choose “NFT ERC-721” choice for our instance undertaking. Nevertheless, since we are going to concentrate on the “PunksTransfer” matter, we have to go along with the “Custome Occasions” choice:

After finishing the above steps, you can be on the “Sync Settings (2 of two)” display screen:
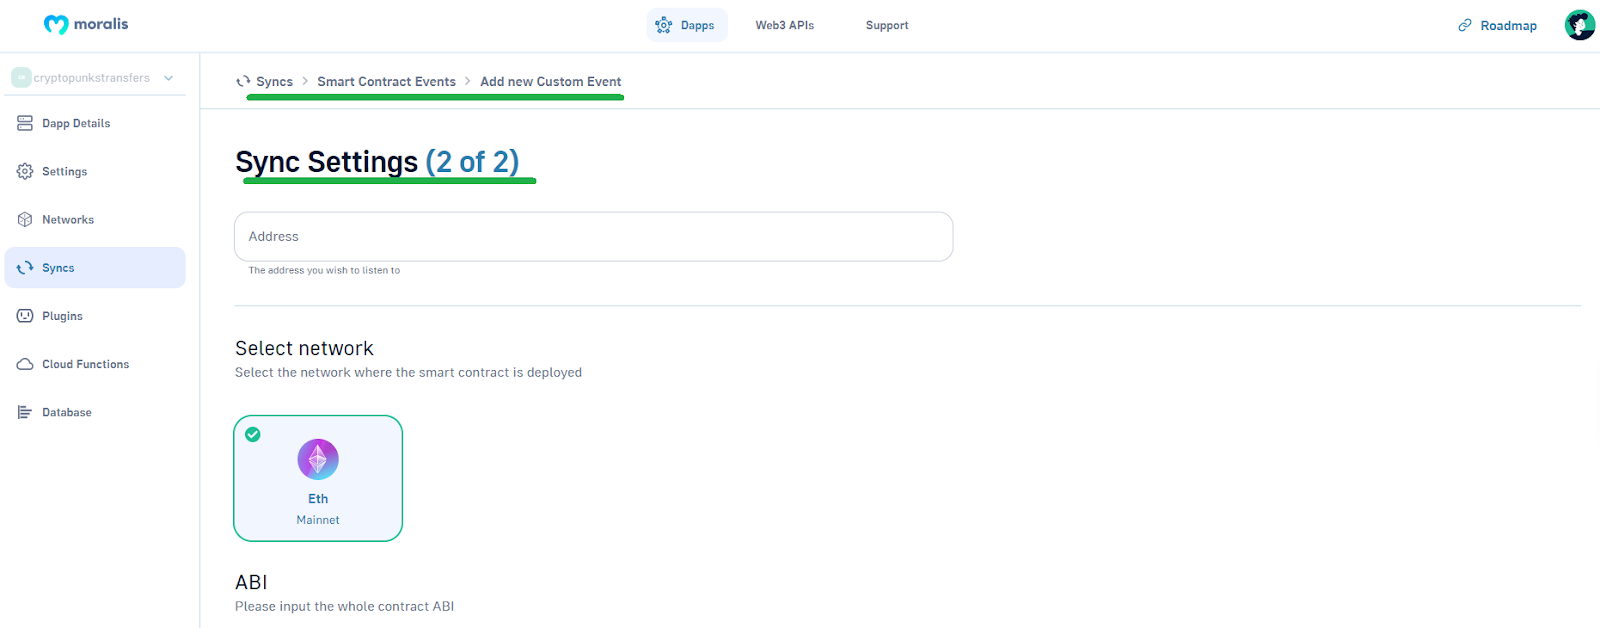
That is the place you might want to enter particular data that matches this instance undertaking’s objective, which is to set in place Web3 syncing for CryptoPunks transfers. Fortunately, the configuration course of could be very easy; mainly, you simply copy and paste publicly out there on-chain knowledge.
Using Public On-Chain Knowledge for Web3 Syncing
Following are the steps you might want to full to sync the on-chain occasions for our CryptoPunks instance undertaking. Then, it’s as much as you to make use of these ideas and apply them to your individual initiatives.
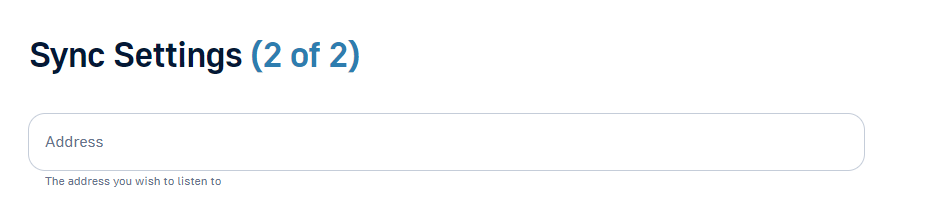
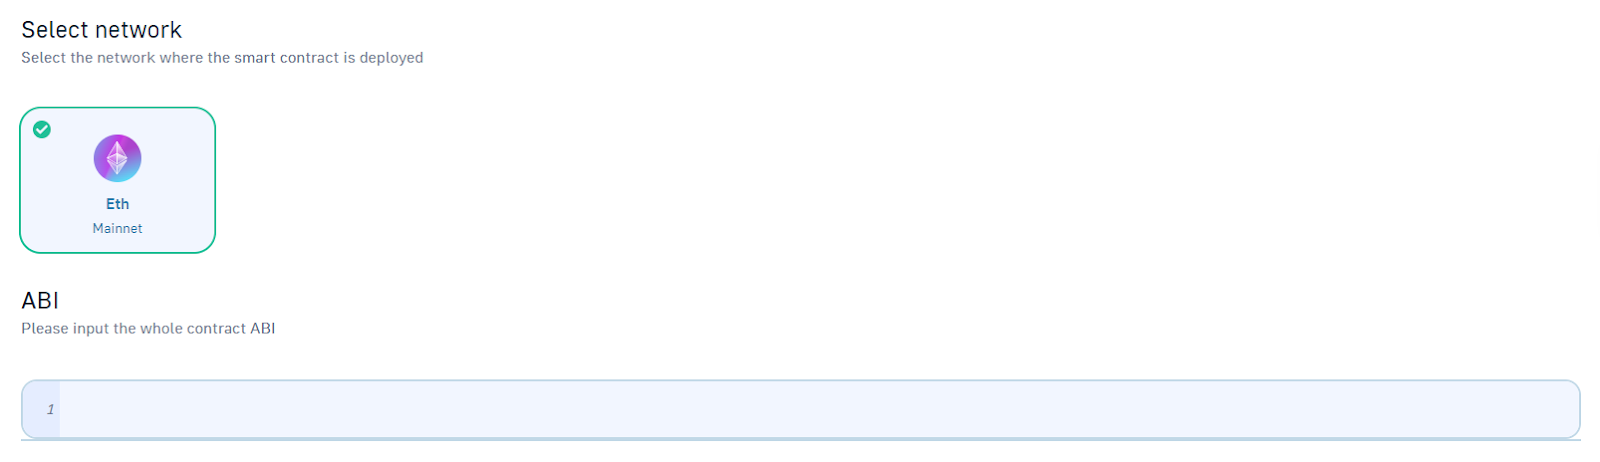
In case you’ve been following our earlier steps, you then at the moment are on the second a part of the sync settings. On the prime, you may have the “Tackle” entry subject:
As such, let’s present you the way to use Etherscan to acquire that piece of knowledge.
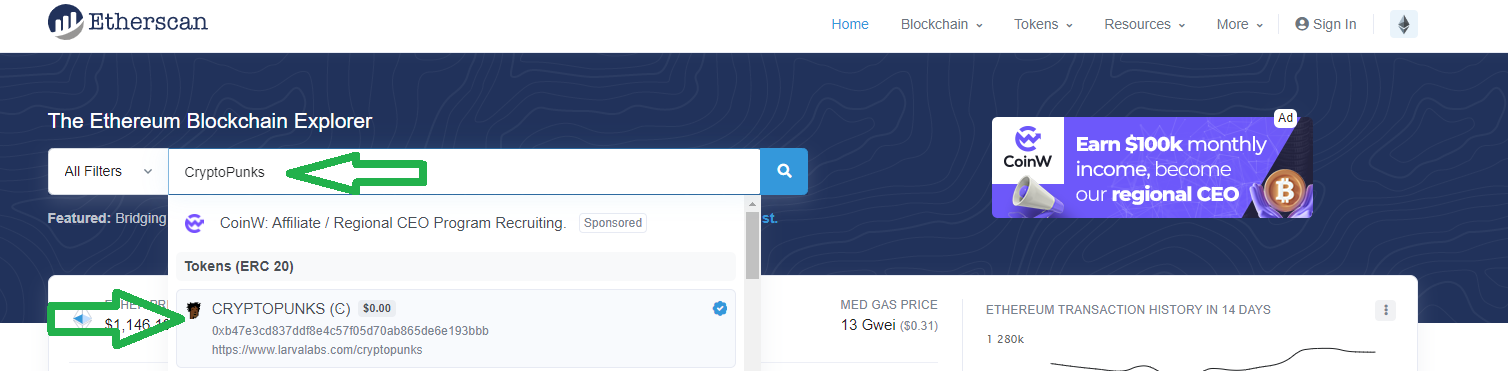
Utilizing Etherscan to Receive the Contract Tackle
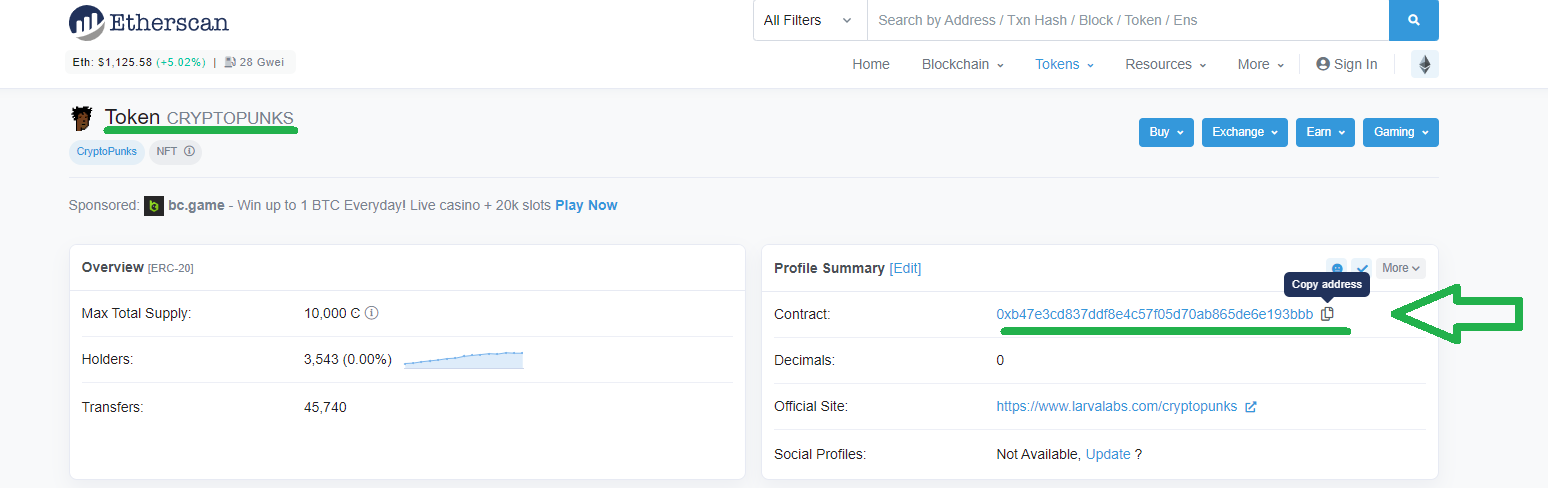
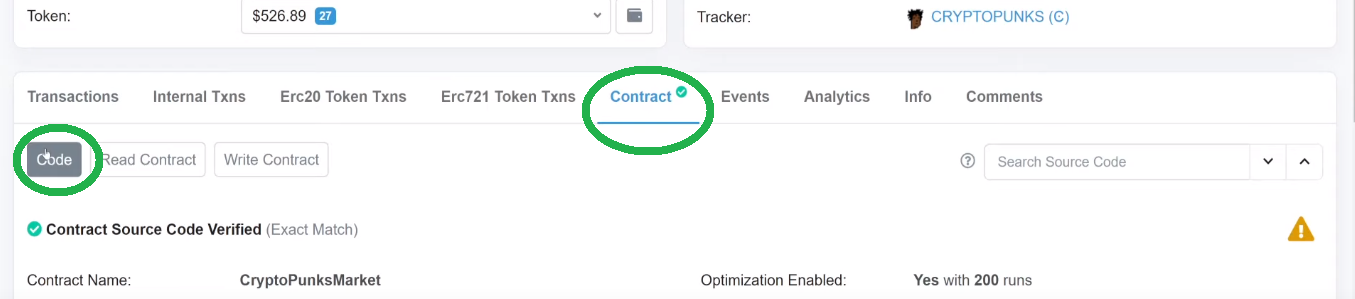
Open Etherscan and use its search choice, the place you need to kind “CryptoPunks” and click on the verified choice:
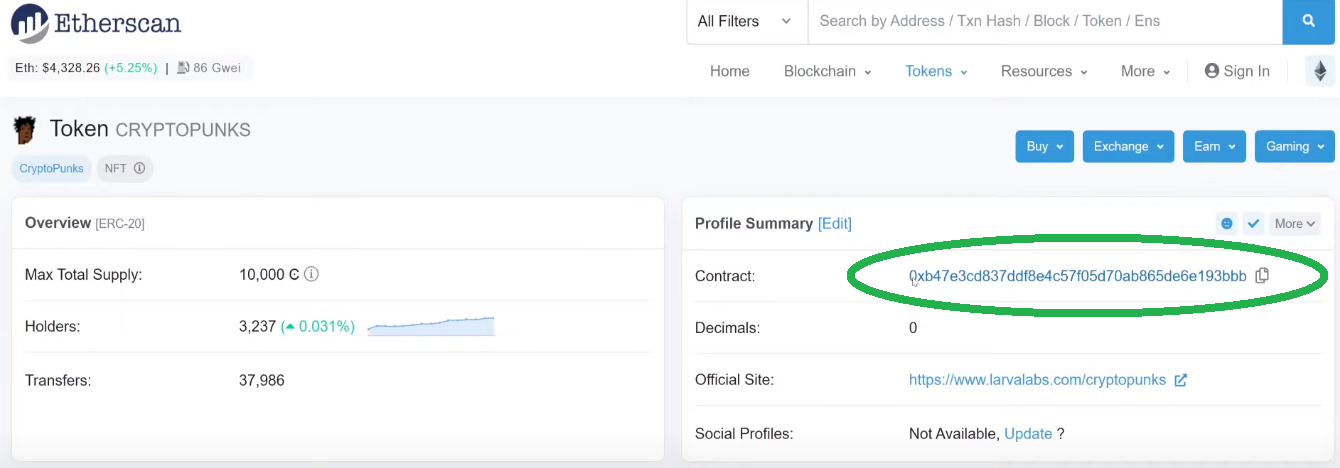
On the “Token CRYPTOPUNKS” web page, copy this undertaking’s contract deal with by utilizing the “copy” icon:
Subsequent, return to the “Sync Settings (2 of two)” display screen and paste the above-copied deal with into the designated subject:

Under the deal with tab, you will note “Eth Mainnet”. The “sync” function robotically selects this chain as a result of we select this community when creating our Moralis dapp:
Furthermore, as indicated by the above screenshot, subsequent is the “ABI” entry subject.
Utilizing Etherscan to Receive the ABI
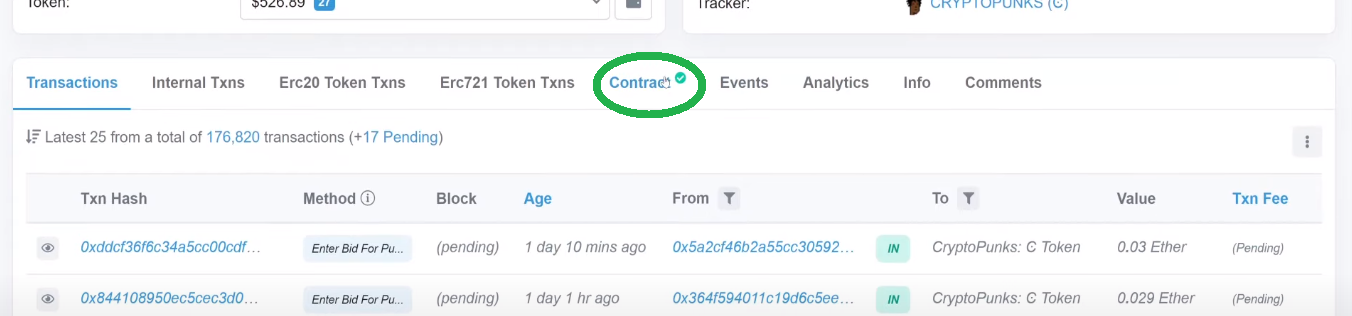
Fortunately, CryptoPunks’ contract ABI can be a bit of knowledge we are able to get from Etherscan. So as to find the ABI, click on on the contract deal with of CryptoPunks:
Then, on the subsequent web page, scroll down a bit. You will notice a horizontal choice bar beginning with “Transactions”. Amongst these choices, you might want to click on the “Contract” tab:
Now that you just’re on the “Contract” tab, first, guarantee that you’re within the “Code” part:
Then, scroll down till you see “Contract ABI”:
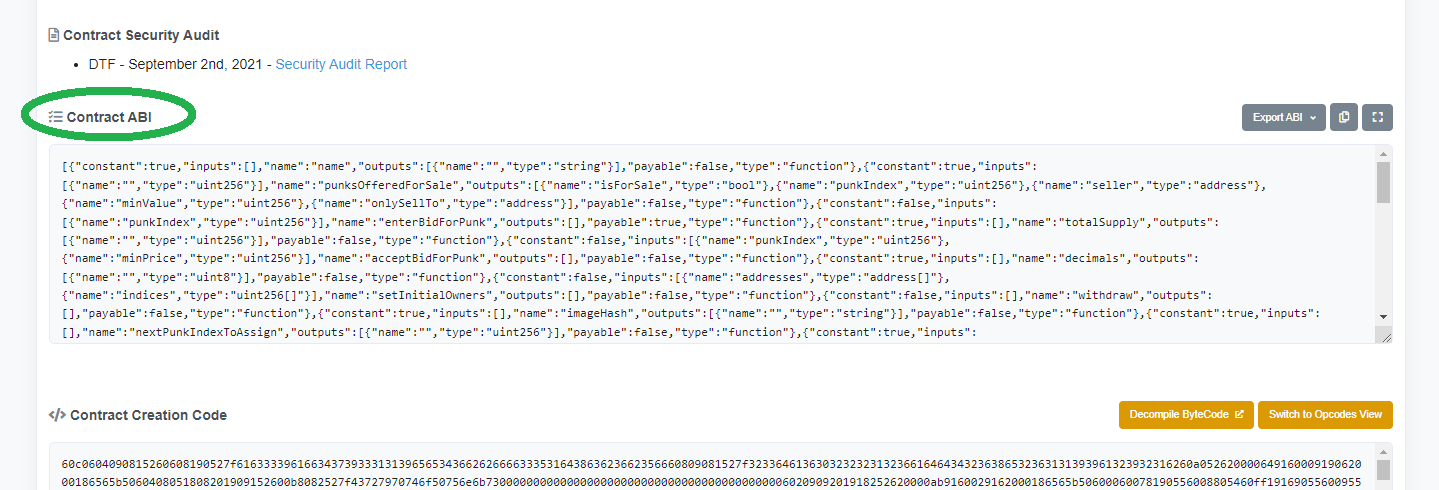
Because the above screenshot signifies, it is a reasonably lengthy array. Nevertheless, you want solely a selected a part of it. Furthermore, to make issues simpler on your self, use your browser’s search choice and sort in “PunkTransfer”. By doing so, your browser will spotlight the search outcomes, which is the a part of the ABI that pursuits you:
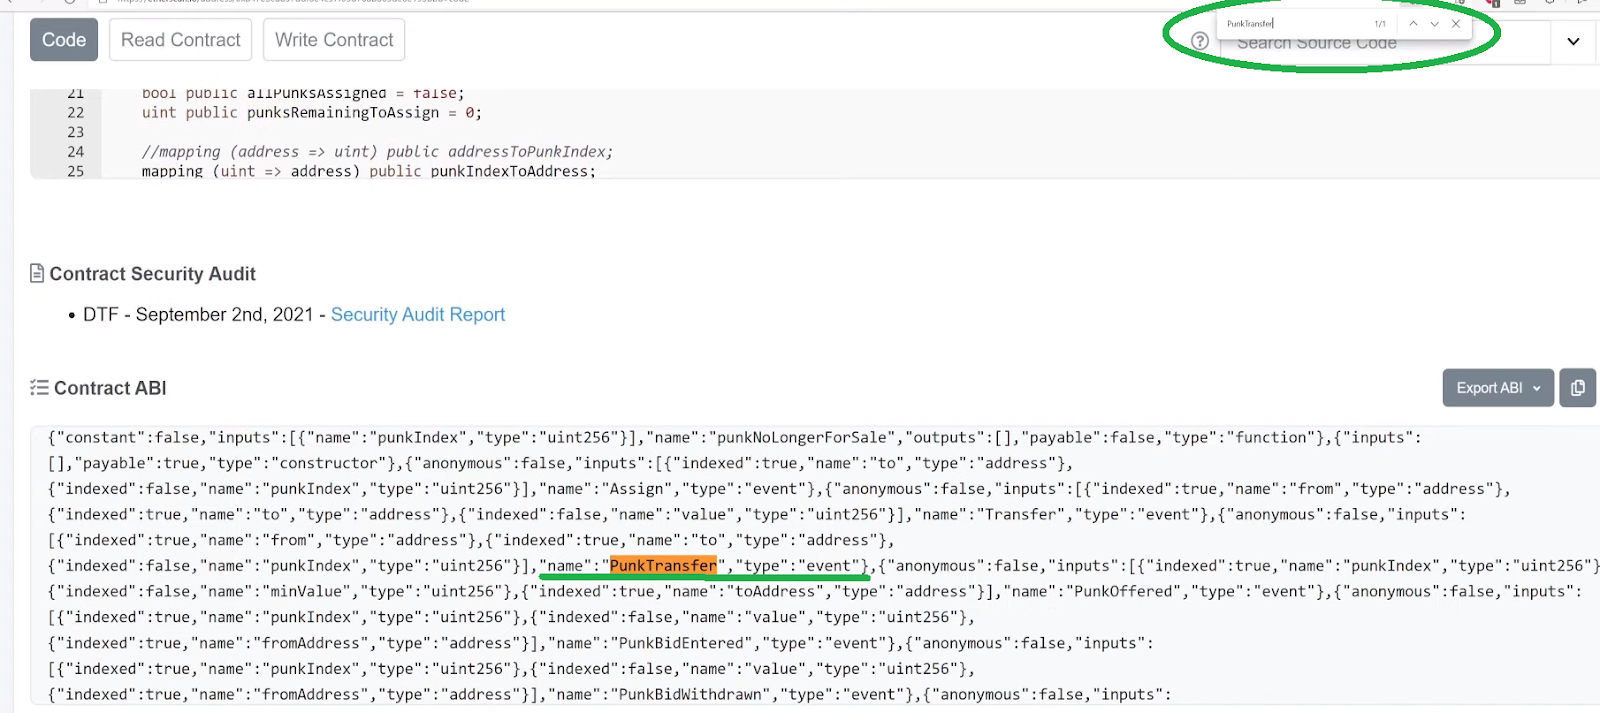
Subsequent, copy all the object that comprises the highlighted “PunkTransfer”:

Then, return to your sync settings and paste the above-highlighted object into the “ABI” part. Make certain so as to add squared parentheses across the object. With the ABI in place, you might want to choose the best matter (there can be just one choice):

Desk Identify, Description, and Syncing Historic Occasions
So far as the desk identify goes, you should utilize no matter you need; nevertheless, we encourage you to comply with our lead and enter “PunkTransfer”:

Furthermore, it’s also possible to use “PunkTransfer” for description:

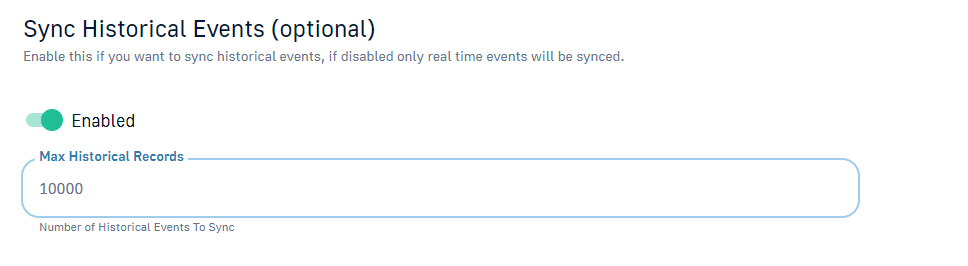
In case you keep in mind, we stated we need to embody historic occasions as effectively. As such, make sure that to allow this feature and enter the max variety of historic occasions that you just need to embody:
Moreover, there’s additionally the “filter” choice, which we won’t be utilizing for the aim of this tutorial. As such, click on the “Proceed” button within the bottom-right nook of the sync settings display screen.
By finishing the above steps, you must see your new Web3 syncing inside your Moralis dapp’s “Syncs” tab:
Observe: The above directions are for the brand new Moralis admin UI. Nevertheless, on the button of the article, you will discover a video tutorial finishing the identical steps utilizing our legacy UI. So, in case you favor to comply with together with the video under, it’d make sense to change to our legacy UI:

Furthermore, when utilizing the legacy UI, it’s helpful to know the way to use Etherscan to acquire the best matter.
Utilizing Etherscan to Receive Good Contract’s Subject
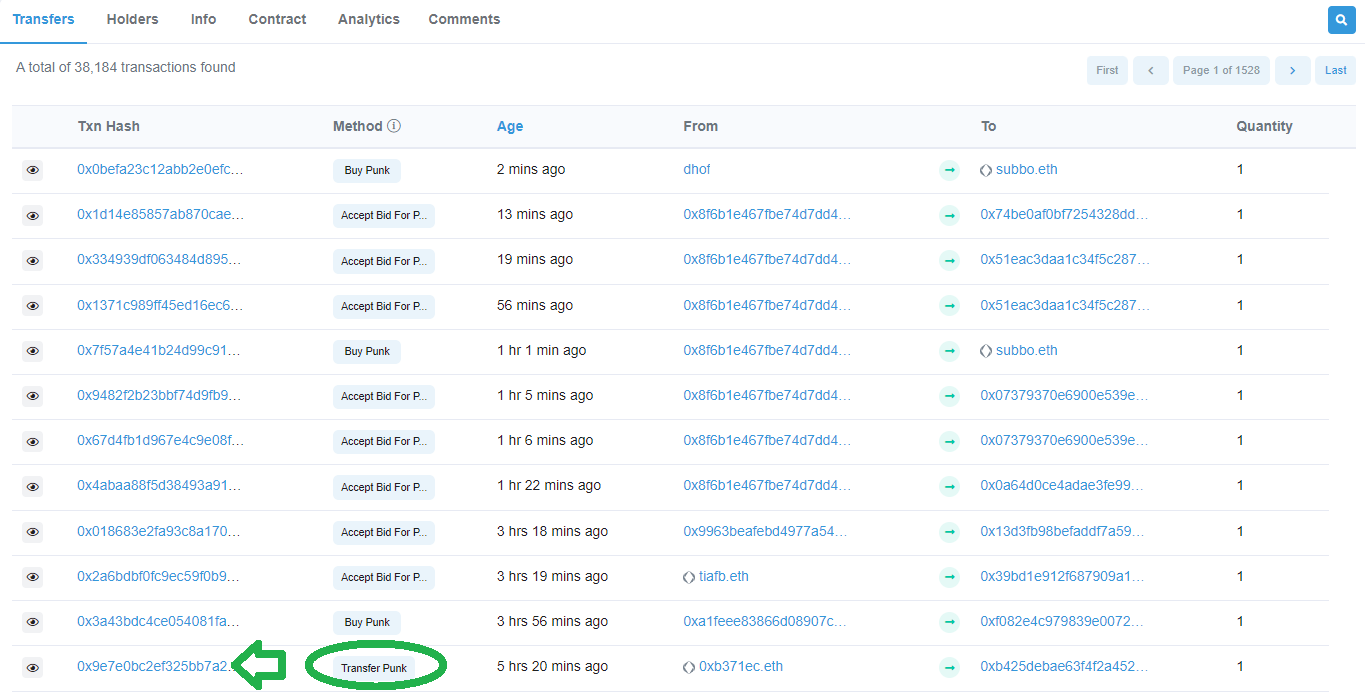
To acquire the subject for sensible contract occasions, you get to make use of Etherscan once more. In our instance, return to the CryptoPunks web page and scroll down till you see the “Transfers” tab. In that tab, click on on any of the transaction hashes for the “Switch Punk” strategies for extra particulars:
Throughout the “Transaction Particulars” web page, choose the “Logs” tab:
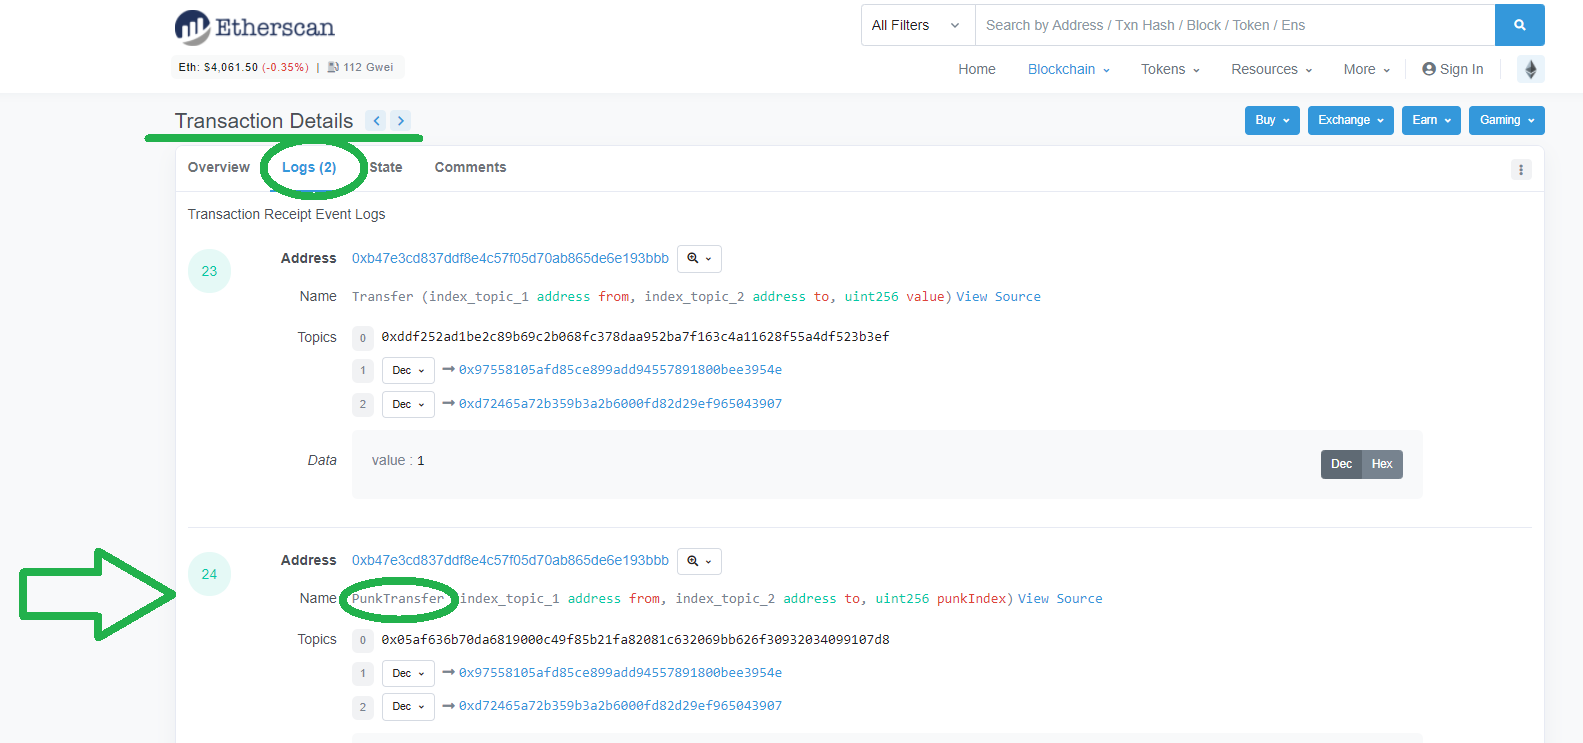
Wanting on the screenshot above, you possibly can see that there are “Switch” and “PunkTransfer” names. And, since, “PunkTransfer” is the one which pursuits us, concentrate on its particulars. To lastly get the subject, you might want to use the small print contained in the parentheses (solely the categories):

So, this it the subject for our instance:
PunkTransfer (deal with,deal with,unit256)
Outcomes of Web3 Syncing – On-Chain Occasions at Your Disposal
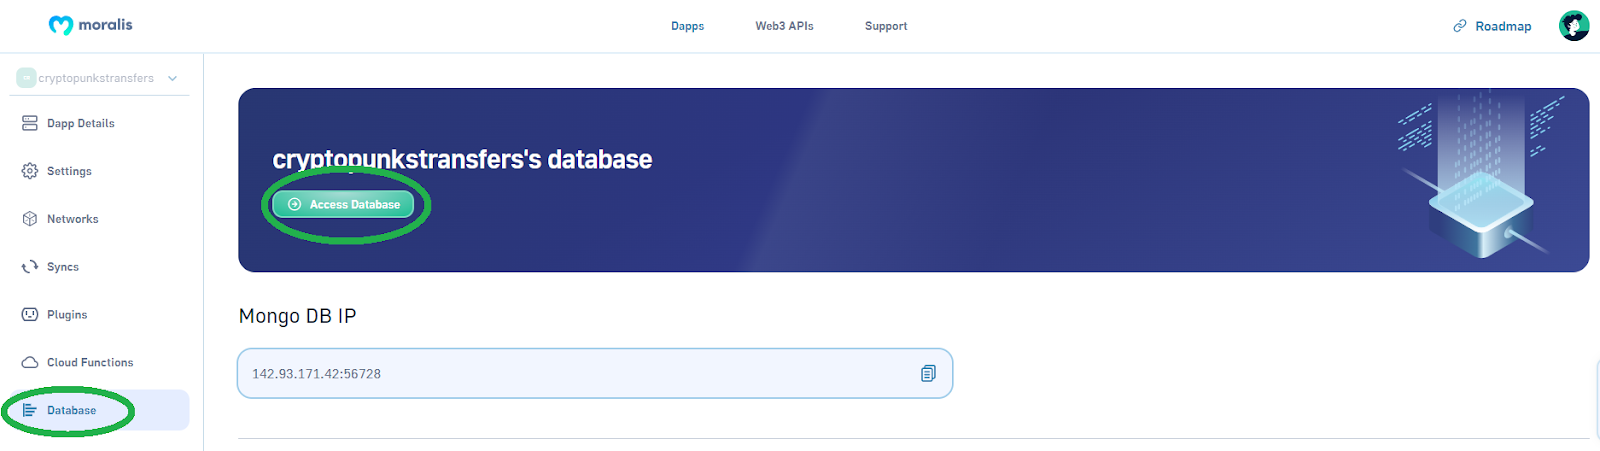
Upon getting your Web3 syncing set in place (as carried out within the earlier sections), you possibly can view the small print of associated occasions in your Moralis database. To entry your database, use your dapp’s settings.
Subsequent, go to the “Database” tab the place you might want to click on the “Entry Database” button:
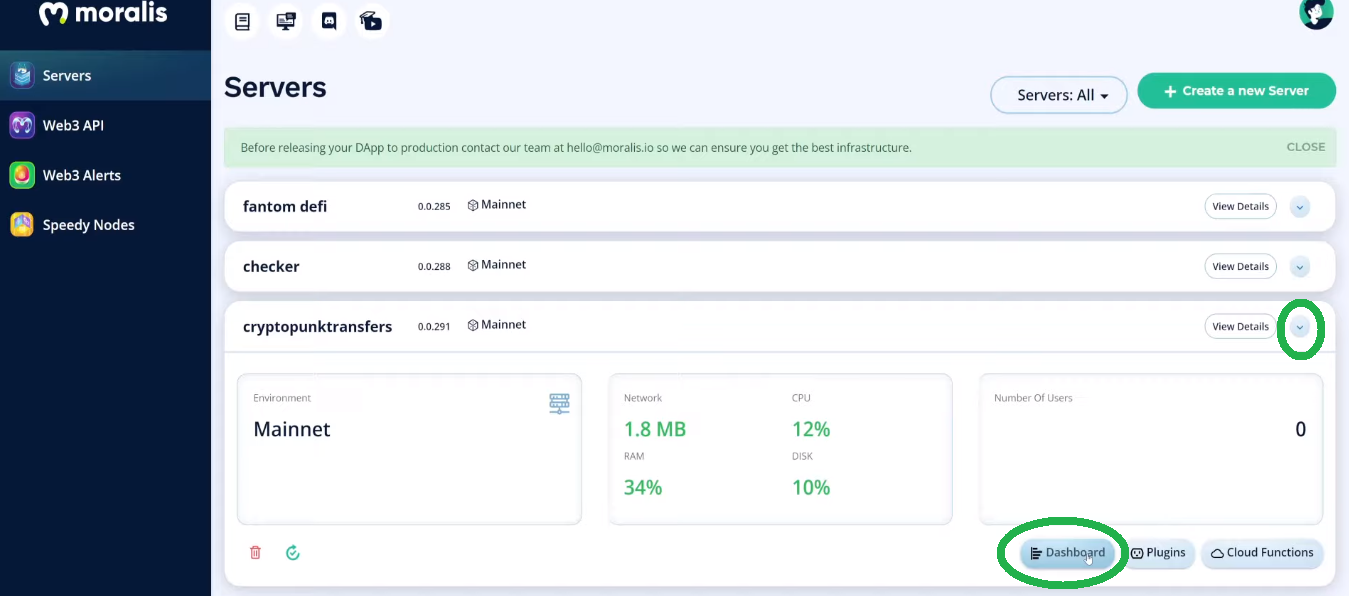
Then again, in case you’ve determined to make use of our legacy UI, that is the way you entry your Moralis database:
Inside your database’s dashboard, you’ll now see the “PunkTransfers” class. The latter was robotically added while you created this sync:
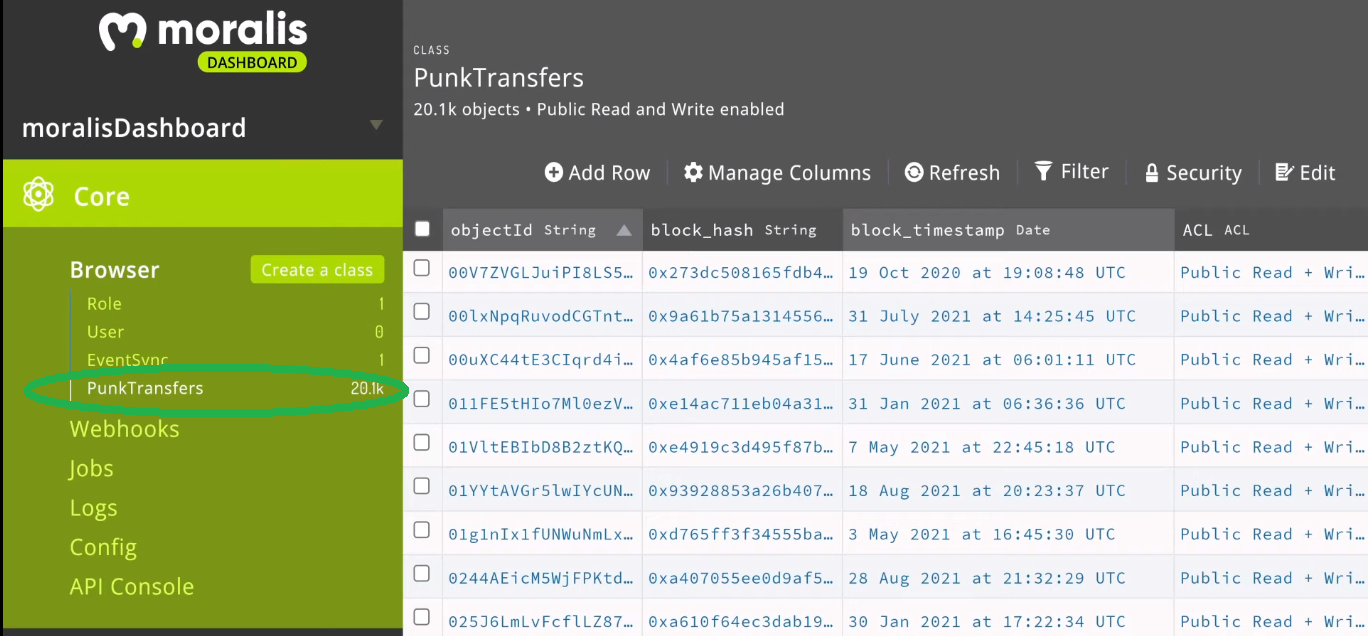
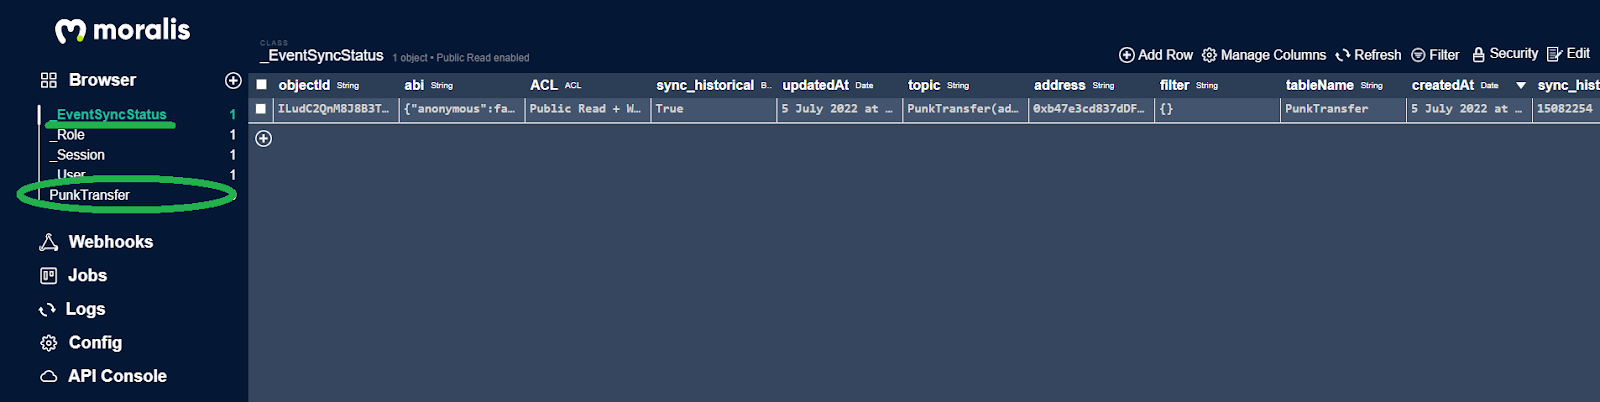
Observe: The above screenshot represents the older database UI (matching the video tutorial under). The up to date database UI is a little more eye-catching, although it comprises the identical particulars. Nevertheless, on the prime, it additionally creates the “_EventSyncStatus”, which incorporates all the small print about your syncs:
Lastly, as promised, right here’s the video tutorial of right now’s Web3 syncing instance undertaking:
Web3 Syncing – Sync Good Contract Web3 Occasions – Abstract
On this article, you had an opportunity to be taught all you might want to learn about Web3 syncing. We first defined what sensible contract occasions are after which confirmed you the way to effortlessly sync your dapps to any sensible contract occasion. Furthermore, you additionally discovered some particulars about Moralis and the way to full its preliminary setup. As such, you now know the way to create your Moralis dapps. Then, we took on an instance undertaking, the place we set in place a brand new Web3 syncing for CryptoPunks. Thus, you had an opportunity to both use the brand new admin UI or the legacy UI to set in place a customized sync. Final however not least, you additionally discovered the way to entry the occasions in your Moralis database. Moralis additionally offers you entry to probably the most highly effective resolution for Web3 authentication.
In case you loved right now’s instance undertaking, we encourage you to go to the Moralis’ weblog and the Moralis’ YouTube channel. There you’ll discover a ton of high-quality content material that may function your free blockchain improvement schooling. As an illustration, a few of the newest subjects concentrate on Web3 webhooks, the way to construct on Web3, full stack Web3 improvement, the way to create an NFT minting web site, our Ethereum dapp API, Polygon dapp API, and rather more.
Nevertheless, if you wish to grow to be a Web3 developer sooner reasonably than later, we advocate taking a extra skilled method. In that case, enrolling in Moralis Academy is the trail you might want to take into account. Other than top-notch crypto improvement programs, that is additionally the place to get skilled mentorship. On prime of that, you get your personalised examine path and grow to be a member of one of the crucial superior crypto communities.
[ad_2]
Source link

